Mobil Mewah

Salah satu sumber Inspirasi.

Mobil Sport terbaik

Anda pasti bisa memilikinya.

Bermain dengan pesawat

Salah satu ide yang gila, Balapan di udara.

Bermain di angkasa

Apakah ini salah satu Goals dalam hidup anda? anda pasti bisa mencapainya

Tuesday, 2 December 2014

Lightweight Battery Monitoring in Debian

I use Fluxbox in my desktop laptop with Debian 7 OS. I need a battery status monitor which is easy to spot the battery status.

So i found this small application, xbattbar which can monitor battery status via acpi which many laptop support nowdays.

Just install and run it with the startup of the fluxbox.

To run it call the application with :

$xbattbar

To run with acpi :

$xbattbar -c

Here are some preview of my desktop. The green bar below is the battery status.

Xbattbar Status in desktop


Friday, 14 November 2014

Centralized vs Decentralized application portfolio strategy

In managing IT startegy, especially Application portfolio, there are 2 management style which are Centralized and Decentralized in decision making. And for better understanding deeper about the 2 style, there are 4 type matrix for the strategy in detailed view using below matrix.

Source: John Ward and Joe Peppard, Strategic Planning for Information System p.336


Tuesday, 11 November 2014

Highlight text in PDF

We all use pdf, because many documents also use pdf for their publishing formats. Even ebooks come with pdf, and sometimes when reading it, we need to jot down notes on it or highlight it as we used to with a books.

So with pdf, we can do highlight the important one, and even the original pdf still intanct. Here come the application that can do this. Xournal is a pdf highlight application, which create a new file to overlay the highlight of pdf. Even you can create your own version of pdf which already been highlihted.


PDF Highlight
Xournal run in Unix BSD, Linux, MacOS , and Windows with source code.

Visit their website xournal

Happy Highlight in PDF.

Saturday, 8 November 2014

IT Cost by Critical Success Factor perspective

In measuring IT cost, we can also use Critical success factor (CSF). This can be use to measure the startegic performance through IT which relate the CSF with the IT cost needed.

With this CSF, organization will have specific target and measurement within IT strategic investment decision.

IT Cost by Critical Success Factor matrix

IT Balance Scorecard perspective

When relate IT to cost, IT always relate to High Cost, especially in initial stage. We need to measure the value of the IT investment made by company related to company performance and metrics, especially understandable by business people.

We are IT people talk about technical performance, and Business people understand about money, reveneu, profit, and other financial measure. So there is gap between IT and business.

Coma the Balance Scorecard which can be use to communicate the IT value provided to business and relate its output with company financial performance like cost Vs revenue  in a balance sheet.

Balance scorecard have 4 perspective in the creation so the balance perspective provided within the scorecard. This is usefull to get a balance perspective with IT or non IT performance measurement.

4 basic question from many perspective in Balance Scorecard :


  1. How do customers see us? (Customers perspective)
  2. What must we excel at? (Internal perspective)
  3. Can we continue to improve and add value? (Innovation and learning perspective)
  4. How do we look to shareholders? (Financial perspective)


Balance Scorecard Perspective


Some example here is provided which relating IT cost with Financial performance indicator :

Relating Cost to the Balance Socreboard of an airline Example

Saturday, 25 October 2014

Django optimizing Memcache and Nginx

I have a django application which complete and ready to deploy. One of the requirement are :


  • It will run 24x7 with minimum interupption
  • Down Time will be only 3 hours every monday
  • User will access concurrently around 17 users

So with this requirement, i want to have my django app high performance without glitch and fast. What already implemented in code are using some method which are :

  • Using Postgresql Database in a separate machine.
  • Using memcached to do caching
  • Using django-compressor to compress static files
  • Using Nginx web server to server static files
  • using Gunicorn to server the Django application
So that all basic optimization for Django application or Web based application. The application is a simple single table query and an insert to database.

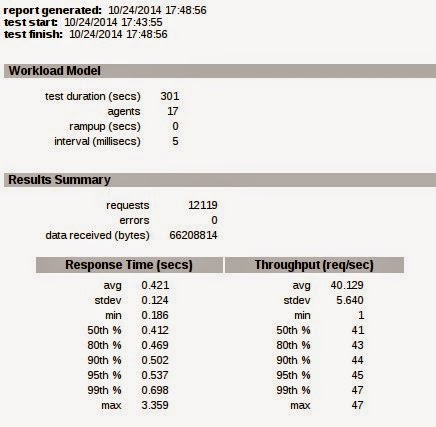
So the application will have insert to table when external user hit the web apps. Then the client will have pool the server for the input every 2 seconds. so the access will be all the time.

So I put some testing of the performance. First using single machine hosting a memcache and postgresql. The setup are :
  • Cache using memcache localy
  • Session using Memcache
  • Nginx server static files
 and here are the results :

Test 1 with single machine setup

Then i try other setup, which difference are put session in postgresql and here the results :

Test 2 Django session using Postgresql

And then last one, i setup a load balanced setup with 2 django app server, here are the setup :

  • Memcached setup as shared memcache between 2 Django app
  • Nginx as a single entry load balance the application request to 2 Django app server
  • Postgresql is still separated machine.
  • Django Compressor is still used.
And here are the result of the test :

Django app load balanced with Nginx in front of application

As you see, the result is better if we horizontal scale the python serving django applications. The load balance in Nginx is a standard setup with 2 upstream point to django app server.

Even the Nginx server still hosting 1 django app, and other machine hosting only django app,with memcache in each server as shared memcache pool, and the postgresql is a single machine.

The improvement is huge. From 40 Req/sec to 117 Req/sec , 2x improvements. This still not optimize the database cache, as i using Django 1.6 and johny cache still not available at this time to be use with Django 1.6

On problem to be note, the django-compressor got problem when setup as multiple python app server, because the key to generate key cache prefix is using the host name, so in one another of the server, there will be missing static compressed file. So we just generate the compressed static in 1 machine, and copied to the other machine and this solved.


Monday, 6 October 2014

PDF generation in Django Apps

One of the beautiful thing when using Django is the rich set of application ready to use as a plugin in your project. Is it use at is or modify/extend with a little effort.

One of my project need to generate a PDF and the time is come to get some Django PDF application plugin. So Django documentation officially told to use reportlab. I try the reportlab, but got error with first try from the code in Django documentation stated here.

Then look further, i found pisa is very neat to generate a PDF for you with a common Django way. How does pisa do the job? Well it still need reportlab, and html5lib , and it just convert your HTML output into pdf output using your django view.

So we already have the html output in Django app, then just feed it to pisa, and the pdf will generated.
You can download pisa3.0.33 in here .

But also notice that pisa3.0.33 is got problem which cause it cannot run with reportlab>3.0 .

To fix it go to the installation of pisa , and find sx/pisa3/pisa_util.py :

if not (reportlab.Version[0] == "2" and reportlab.Version[2] >= "1"):

   raise ImportError("Reportlab Version 2.1+ is needed!")

REPORTLAB22 = (reportlab.Version[0] == "2" and reportlab.Version[2] >= "2")
This will make pisa fail when the import processed by python. To resolve this replace it with this code :
if not (reportlab.Version[:3]>="2.1"):

    raise ImportError("Reportlab Version 2.1+ is needed!")

REPORTLAB22 = (reportlab.Version[:3]>="2.1")

Then that's it, your pisa will work with Django.

The next post , i will give the code to generate the pdf with pisa in django.

Cheers

Wednesday, 1 October 2014

Display disk usage in graphical way

Recently, i got my disk usage 100% in my home folder. With using only du in linux, we got only text output about the disk usage. I need to see which folder occupy most of the disk space in a quick way, in a glance and in an interesting way, using graphical representation.

So i search for the application to do this in linux, and i found Baobab. This application name not imply its usage, but very neat. We can see the disk usage in a graphical way, using a ring chart , and also have the list of subdirectory we scan so we can got the directory which consume much of the disk space.

Baobab application
Baobab application screen shoot
With this, it is faster and quicker way to find the folder which occupy most of the space, even with remote folder. This feature i found most interesting.

For the website source and developer can go to baobab website

Nice to share this. Hope you got benefit from this share.

Sunday, 28 September 2014

Shellshock Vulnerability CVE-2014-6271

The Bash Shell have a new exploit named shellshock.

From Thursday 25 september 2014, Bash have a bug that realy make everybody paranoid. The exploit is CVE-2014-6271 which enable the attacker to run any code even without authenticating to the server, especially with DHCP services.

Stephane Chazelas discoverd this vulnerability in bash, related with the how the environment variables are processed by bash and this affect many of the linux / unix system which by default utilize bash shell. This affect Bash released 20years ago back to version 1.3

Lucky for me, i am in the BSD bandwagon, which by default not using Bash, but using tcsh or csh, which licensed under BSD license term. The reason Bash not a default install in BSD system because Bash is use GPL Licensing term.
But i don't know if this will change if Bash using BSD license, but i think because Bash was develop with no security in mind. Yeay Go BSD :)

But some servers use bash need to update. First you can test it with the command.

env x='() { :;}; echo vulnerable' bash -c "echo this is a test"

if the output print out vulnerable, then you need to upgrade your bash version to the latest. Redhat, Debian, Ubuntu, and all major Linux Distro already release a fix for this, but only days, the fix show that it only prevent no all the bug, like Redhat said in the website.

But still better patch first, as a first step for prevent the vulnerability. Also there are many test utility for this shellshock in the web. One that i found was Shellshock HTTP Test and Shellshock Vulnerability Test

Now for the update , in debian system you just run this command :

$sudo apt-get update && sudo apt-get install --only-upgrade bash

In Centos / Redhat system :

$sudo yum update bash

or download the rpm file with this command (in Centos 5.10) :

$ wget ftp://fr2.rpmfind.net/linux/centos/5.10/updates/i386/RPMS/bash-3.2-33.el5-10.4.i386.rpm

$sudo yum --nogpgcheck update bash-3.2-33.el5-10.4.i386.rpm

This Shellshock worse than last openssl vulnerability, because many old system affected like the cgi web server processing services. But in modern web application i had test, which running python, not affected by the shellshocks because not using Bash shell.

Tuesday, 2 September 2014

Control Cache directive for Web Server

When dealing with a Web application, the web server is our gateway to the application server. The best practice to separate the load between application code and static files are the task of the web server. This to make sure the application server just handle the thing they good of, the application.  Let the burden to handle the serving of static files be lifted from the application server. Have mercy for the application server.

So the best practice is the static files handled by web server directly, and the application generated content goes to the application server. Now the load already separated. Now to get more of your application speed, we want to control how long the static files get cache by the client browser.

The question is can this be done? Yes this is can be done, this is included in the HTTP protocol specification rfc7231. We can control how long the request result will be cached by user web browser, and newer web browser will respect this header if ever appear in the http request results.

So the directive can be use are :

cache-control: private, max-age=0, no-cache


This means cache-control is active.

The private directive means the request should not be cache by shared cache like proxy server. But the local private cache can do the caching.

Max-age means the maximum age of the request result that considered valid since first request result arrived in client and can be used by the client.

no-cache means don't do any caching in client web browser. The browser will always fetch the new content from the web server.

Note if you want to increase the max-age, then remove the no-cache directive.

This can be applied to any webserver, including Microsoft IIS without change anything in the registry. The same with Nginx or apache or lighttpd.

Good luck and happy serving web content.


Monday, 16 June 2014

Add Vmware client as a service in windows

So how to make Virtual machine running with VMware workstation run as a service with windows.

This will allow a VM keep running when log out form windows sessions.

We can do this with windows resource toolkit to register a service in windows server.

First download from microsoft website the Windows 2003 resource tool kit by search in microsoft website windows 2003 resource tool kit.

Then after install the resource toolkit, we need to run the instsrv.exe to register, and use srvany.exe .

The default installed to program files folder.

VMware can be initialized within command line, so we use the command to start the VM from the service console.

Here are the command for running VM :

"c:\folder\to\vmware.exe" -X "c:\folder\to\vmserver.vmx"

With that command, vmware will launch a VM with vmserver.vmx config file.

So we install first the service, let say the name is VMServer1

C:\path\to\instsrv.exe VMServer1 C:\path\to\srvany.exe

You will have the service in your services list MMC in windows control panel.

After that, you can edit the service from windows registery.

Open regedit.exe , then find :

HKEY_LOCAL_MACHINE\SYSTEM\CurrentControlSet\Services\

Look for the service name we created before, which was VMServer1, then

right click, select new, then click key. Give the key name Parameters .

Then in the Parameters key, right click and select new string value, name it Application.

Then the value of the Application will be the vmware workstation command line i stated above. Put in the value there.

Then you can check in the service console of windows 2003, then look the property and select the Log On Tab,  Make sure the Local System Account is selected. And select the Allow service to interact with desktop check
box.

This way, your VM will run when you are login.

Monday, 2 June 2014

Multiple Network Configuration in Linux

Multiple Network Configuration in Linux
I have a Debian linux OS and use it in my office and in my home. The network configuration i use is using static configuration. I have problem with this, when i swicth from home to office network, the configuration is different, the routing also different.

Everytime I switch network, I have to open the configuration file in /etc/network/interfaces  and enable / disable configuration line.

So I do some research and found that we can create a multiple configuration in the interface file. so when we have let say 2 config called home and office, we switch the configuration by issuing this command :

#ifup eth0=home

#ifdown eth0=home

#ifup eth0=office

#ifdown eth0=office


So lets go with the example , file /etc/network/interfaces  :

auto lo

iface lo inet loopback


#home config

iface home inet static

   address 192.168.1.100

   netmask 255.255.255.0

   broadcast 192.168.1.255

   gateway 192.168.1.111

   dns-nameserver 8.8.8.8


#Office config

iface office inet static
  address 192.168.100.100

  netmask 255.255.255.0
  broadcast 192.168.100.255
  gateway 192.168.100.24
  dns-nameservers 8.8.8.8
  up route add -net 172.16.0.0 netmask 255.255.0.0 gw 192.168.100.99


With this config file we can just set the interface configuration to the one we need. Example when in office issue this command :

#ifup eth0=office


If in home, just issue :

#ifup eth0=home

With this configuration, we not need to touch the configuration files.
How about the GUI ? Well, i am a server guy, so command line is powerfull enough for me.


Saturday, 17 May 2014

Use Bash in FreeBSD machine

Bash In FreeBSD
FreeBSD using C shell for the root user, and the user got sh for their shell by default. And there are so many shell can be used. But why you want to use bash at the first place, in FreeBSD terminal ?

One thing for sure, every Linux distribution by default using Bash as their shell of choice. This will get some compatibility if you create script which not run in Bash. So the options was you use bash or you change your script.

So the option to using bash shell in FreeBSD is open. we can change any type of shell we want to use. So now i will show how to change the default shell in FreeBSD which i had encounter and some tips which not a standard setup for Bash in FreeBSD.

First, install bash shell if not installed. Here are my step to install :

#cd /usr/ports/shell/bash

#make install clean


Then to change the shell as a user :

$ chsh


This will prompt user profile, change the shell to /usr/local/bin/bash

Then you can relogin to get the bash shell.

And in Linux , you can create profile for Bash, so when login the script executed. This was called .bashrc , but not in FreeBSD.

To make the bash start script run when user login, you must put it in .bash_profile .

This happend to me when i want to create a virtualenvwrapper setup in FreeBSD.

That's it. you have your Bash way.

Thursday, 15 May 2014

Git Branching Model for Great Project

I got a development bump when using GIT. Currently i do the master branch only with git and develop all in master branch and log back to the master branch.

Now i start using the git branching for development of new feature, and all the way, i got confuse if i merge back to master, the current running stable version i cannot revert.

I remember the git tag usage, so i can tag the point where the code was stable, the same way when using svn for source code management.

But in git, i think and search a better way and a best proven practice somebody else employ and works in the project very well with single fighter or with many developers.

So i look for it in the web, and i found one. This is very interesting and i would like to share it and blog about it.

I will give the link [1] to the site where i learn a lot. Here are some summary i got :

  1. Always have a Master and Develop branch in origin repo.
  2. In master use Tag to pin point the stable release of the code. Master branch is the production ready code ready to be deploy.
  3. In your own repo or developer repo, you can have feature branch, release branch, hotfix branch. But not in you origin repo.
  4. Some rules to be remember :
    For branching out ::
    Feature branch always branching from develop branch.
    Release Branch always branching from a ready develop branch.
    Hotfix branch always branching from Master

    For Merging in :
    Feature branch always merge back to Develop branch when ready.
    Develop branch alway merge back to Release branch when ready.
    Hotfix branch always merge back to Master and Develop branch.
  5. Always remember the rules and better explanation is with a picture.
For the better understanding of course the picture :


Picture explain a thousand words right. Hope this help. What do you think about this method? are you have any other best method you employ in your GIT work flow with greater success, share it with me.

Source :
[1]  A-successful-git-branching-model , download at  15 May 00:07 +8 GMT

Wednesday, 14 May 2014

Django Collectstatic usage

Django Collect Static Usage
After some project completed and had a common project template layout directory , usually we will want to reuse the previous project template. But there are some static files which not belong to new project anymore. This needs time to fix.

The question is, can we put the static files for an application in their own static folder, not in the project static file it self? so when we use the app in django project, we also no need to copy to project wide static folders, which served by the webserver, usually Nginx or apache.

So come the rescue Collectstatic command in the Django admin. These feature available since Django1.3, but i actually never used it until now i understand how to implement it, and it's smart. So how to use it? I will share the step-by-step to make the collectstatic run without hassle and give speed up in development. This run with Django < 1.6 as i write this.

Step 1 :

in your settings.py :

STATIC_ROOT = '/usr/local/www/1millionproject/collected_static'


Then let say you have an app called ordernow

Step2 :

create a static folder and put any static directory or files in the folder.

ordernow/static/orderstyle.css
ordernow/static/images/produt1.png

So what happend and how to get the static file in the correct path inside project ?

Step 3 :

From your project root directory run the collectstatic command :

$python manage.py collectstatic

Then you will get a prompt and warning if you want to proceed to collect all the static files in your application folder and put it in the STATIC_ROOT location you state in Step 1.

Then make sure you set the STATIC_ROOT accessible from the webserver which will serve the static files.

In your Django code, use it as usuall with {{ STATIC_URL }} in your template files.

So the benefit of using collectstatic command is you won't need the copy command to your initial project files. Also when deploy to the production server, just issue collectstatic command and all the static files will copied from the app folder to your public static folder.

This is one of some nice features Django have. I love it especially you have many reusable app with its own static files. All will be in 1 place in the application specific directory.

How about your way, you can give a comment and share.

Thanks for reading.

Friday, 18 April 2014

The Best Compression available

When working with files, especially large files and need to be transfered over the network, one optimization can be done is with the file size. We can compress the file to the smallest size, but how small is small ?

So i look up for some comparison about the file compression to be used in linux system. For usual compression in linux, the compression used was .tar.gz or .tar.bz2 . I prefer use .tar.bz2 because better than .tar.gz .

But you know what, there are other compression that is better which is .rar and .7z .

I look for some data and got the comparison chart. You can see the chart below.
Surely the result is compelling, and look to use .7z . In linux there are 7zip package which called p7zip , in debian linux.

I also tested with my current file, which use bz2, and compress it using 7z, I got around 20Mb - 100 Mb more disk space with 7z compression, even with mp4 video files.

So more disk space left for storage when using 7z compression. No worries with the compatibility, because 7zip also available in any Operating System like linux, windows, MacOS.

Here are some how to use 7z compression.

To install :

$ sudo apt-get install p7zip-full

To compress :

$ 7za a big-bang-theory.7z  big-bang-theory/

To test compression :

$ 7za t big-bang-theory.7z

To uncompress :

$ 7za x big-bang-theory.7z

So happy Compressing.


Monday, 14 April 2014

Heartbleed SSL Vulnerability

Recently the IT Security community had a security event  about OpenSSL bug which is widely use by server that implement SSL/TLS secure connection.

The bug enable an attacker to see 64k size of memory content of the server without leaving a trace. This including the primary data, which is private key of the encryption.

The bug revealed by Neel Mehta of Google's security team and reported the defect on April 1, 2014 to the OpenSSL team.

The Heartbleed name it self come from a Finnish cybersecurity company, which also created the bleeding heart logo, and launched the domain Heartbleed.com to explain the bug to the public, which called codenomicon. They reported on April 3, 2014.

This bug effect was so big to the internet community. On April 10, "Cisco Systems and Juniper Networks, two of the biggest creators of Internet equipment, announced that their products had been affected by the Heartbleed bug. Routers, firewalls and switches, all likely been affected by the bug, leaving your personal information at risk of being stolen by hackers."


Even some independent researchers On April 12, were able to steal private keys using this attack from an experimental server intentionally set up for that purpose by CloudFlare.

What is the impact of this ?

When a service that use OpenSSL which is vulnerable, some attacker may be able to retrieve sensitive information, anything include secret keys which is the primary information in OpenSSL infrastructure.


With the secret key, they can create a spoofing server, even run a Man in The Middle attack with the private key. Even with you not know that it was happening.

Who uses OpenSSL ? any service which utilize SSL/TLS would it be https server, vpn connection end point, in switch, router, email, is using the OpenSSL for the underlying system.

I also use the OpenSSL software, because its opensource and free. Many internet server and services use it. But not every OpenSSL implementation affected. Check your OpenSSL software version you use.

The affected versions of OpenSSL include OpenSSL 1.0.1 through 1.0.1f (inclusive). OpenSSL 1.0.1g, OpenSSL 1.0.0 branch and OpenSSL 0.9.8 branch are not vulnerable

Almost every Linux distribution come with OpenSSL by default. My self using FreeBSD, but the affected version is up to FreeBSD 9.2 or release that use OpenSSL version mentioned above. You can check in FreeBSD website.

Even in my local linux machine, which is Linux Debian 7.1 Wheezy affected by this. But Debian had release a fix in here.

What to do for user is make sure have a password which is changed every 30 days minimal. With this event, you better change your password. I even hear yahoo was affected and they fix it quickly, but who knows what had leaked.


Monday, 7 April 2014

Text To Speech in Linux Debian

Do you know that in linux, you can enjoy a good quality of text to speech application with good quality like the one available in Windows.

And just like other high quality open source software, these application are free to use.

The one i found out and used it is quite easy to use.

I will share it in here so you can benefit with the application.

First you need libreOffice, which will become the GUI. Neat right, because we usually use libreOffice to word processing office like apps.

Then we combine SVOX tools (pico) with LibreOffice.

To install in linux debian :

$sudo apt-get install libttspico0 libttspico-utils libttspico-utils 

And how to run the tts? well, we can use the LibreOffice extension.

Install the readtext extension of LibreOffice.

To install the readtext extension, just download the extension, then in LibreOffice, go to Tools - Extension Manager , and add the extension file.

After that you must reload LibreOffice. It will show up as a small smiling icon in the left side of the toolbar.


And to use it, just select the text, and click the readtext extension icon (a Happy face with a ballon) , a pop up will be shown, and setup the command line options to use PICO_READ_TEXT_PY .


Then you get a working text-to-speech system with the beauty of Open Source program.

Enjoy the text to speech system.

Tuesday, 1 April 2014

Debian linux Routing configuration

In Debian linux, i need to add some IP specific routing config. I have a default route for internet, and have other gateway for other services to access.

So i need to be able make the routing configuration is injected when the network services loaded.

How to do this are, in your /etc/network/interfaces add this :

auto eth0

iface eth0 inet static
  hwaddress 00:1b:24:b0:b7:8f
  address 192.168.113.109
  netmask 255.255.255.0
  broadcast 192.168.113.255
  gateway 192.168.113.224
  up route add -net 172.16.0.0 netmask 255.255.0.0 gw 192.168.113.204
  up route add -net 172.30.0.0 netmask 255.255.0.0 gw 192.168.113.205
  up route add -net 192.168.0.0 netmask 255.255.0.0 gw 192.168.113.206
  up route add -net 10.0.0.0 netmask 255.255.0.0 gw 192.168.113.104


So the result are like this :

Default traffic going to 192.168.113.224 , and traffic going to network 172.16.x.x going through gateway 192.168.113.204 , and same rule apply to the next network destination.

You can add more route according your needs.


Wednesday, 12 March 2014

Upgrade from Django15 to Django16

Upgrade Django 1.5 yo Django 1.6
Here again I am trying to upgrade my application from Django1.5 to Django1.6 which I documented here.

The bump I found in my code was the url import in urls.py

Before we import urls like this :

from django.conf.urls.defaults import *


In Django1.5 there was warning that this will be deprecated. Now in Django1.6 , the app wont start.

Instead we must use this for the import :

from django.conf.urls import *


The package moved to other place. This was a bit wow for a big applications where the urls.py spread all over the application.

For backward compatibility I use this import :

try:

    from django.conf.urls.defaults import *

except:

    from django.conf.urls import *


Then the other bump was the cache_page decorator. In Django 1.3 the usage was :

from django.views.decorators.cache import cache_page

urlpatterns = ('',
    (r'^foo/(\d{1,2})/$', cache_page(my_view, 60 * 15)),
)

In Django 1.4 the usage was :
from django.views.decorators.cache import cache_page

urlpatterns = ('',
    (r'^foo/(\d{1,2})/$', cache_page(60 * 15)(my_view)),
)

when in Django1.5 there were deprecated warning for the cache decorator. It said :

The cache_page decorator must be called like: cache_page(timeout, [cache=cache name], [key_prefix= key prefix])

And in Django1.6 there error came out in using cache decorator. How I use the cache decorator was  :

url(r'^sitemap\.xml$', cache_page(sitemap,LONG_CACHE), {'sitemaps': sitemaps}),

So to fix it, we need to change the calling of cache_page decorator. We call using the cache_page(timeout, viewfunc) so here are the fixed url :


url(r'^sitemap\.xml$', cache_page(LONG_CACHE)(sitemap), {'sitemaps': sitemaps}),

With this all working in my application.One thing which i concert is that johnnycache not working in Django1.6 which needed for cache all database query.

The most version updated version i use now will be Django 1.6.2 as per today 9 March 2014.

Hope this give hint for you who need upgrading also.

Tuesday, 11 March 2014

Testing web application performance

For developers, we need to know how to test the performance of our application. Some tools are available to hit your application and know about the maximum performance you can get. Of course the test done on the same machine of production or just in your local development machine.

Why we need to make this test ? Actually is it a simple question. For most of the test done, we need to know the baseline of the application, and if we make some improvement, we need to know how it is affect the application performance.

For new application baked from your development lab, of course the result give use some baseline for the application performance.

After the application running for a while, we got hit and seems something can be done better. We update, and we can test again with the same testing parameters. Then we can compare the result with the previous results.

So the testing can be done in linux using apache bench, or httperf. With the tool we can test with concurrent connection and state it in the command.

Because I done some code in python, I found some neat tools to test the web application performance, using python. The application used was Pylot, if you have heard of it. It comes with 2 mode, GUI and console mode, and have a nice html report.

So lets get started to use it. Get and extract it to your folder.

Then you can config the pylot default behavior, inside pylot folder, go to core, you will find config.py , then contents are :

AGENTS = 1
DURATION = 200  # secs
RAMPUP = 0  # secs
INTERVAL = 0  # millisecs
TC_XML_FILENAME = 'testcases.xml'
OUTPUT_DIR = None
TEST_NAME = None
LOG_MSGS = False

GENERATE_RESULTS = True
SHUFFLE_TESTCASES = False  # randomize order of testcases per agent
WAITFOR_AGENT_FINISH = True  # wait for last requests to complete before stopping
SMOOTH_TP_GRAPH = 1  # secs.  smooth/dampen throughput graph based on an interval
SOCKET_TIMEOUT = 300  # secs
COOKIES_ENABLED = True

HTTP_DEBUG = False  # only useful when combined with blocking mode  
BLOCKING = False  # stdout blocked until test finishes, then result is returned as XML
GUI = False

You can change the content of the config as you wish. Then to run it from pylot root folder, the run.py you can call from command line.

And for easy test, you can create xml file for each of your test profile. for example the devtest.xml content for testing local Django application :


        http://127.0.0.1:8000


You can also specify the output directory of the report in run time using -o directive.

Now to run the test, just call :

$python run.py -o report -x devtest.xml

This will run by default config above for 200 second and finish. You will have the html report in the report directory you specify before.

Next I will post my test result with my app running Django 1.5 and Django 1.6 , as i have upgrade my previous version of Django application before .


Sunday, 9 March 2014

Upgrade Django 1.4 to Django 1.5

Upgrade Django 1.4 to Django 1.5
After successfully upgrade my Django app from using Django 1.3 to Django 1.4, now i try to upgrade my app to be running Django 1.5.5

Some method i use are :

+ OS Debian 7
+ Python 2.7
+ Virtualenv

Django 1.5.5 released around October 2013. Here are the Official Release Notes

The deprecated feature was the new way of handling url in template.

What i got was the project template still the same with Django 1.4.10 .
After running I got bumped with deprecated feature which is url "new style" usage.

So before i use this :

{% url public_detail_billboard object.slug %}


It will give error :

'url' requires a non-empty first argument. The syntax changed in Django 1.5, see the docs.

So we need to change it to :

{% url "public_detail_billboard" object.slug %}


Lucky for me, my application only breaks in the url method in the template. But the url all over the template. so i need to update the url to add some " " .

But we can do some faster thing with this, we are programmer right?

we can use sed to the rescue, here are the sed command which will do your job :

find . -type f -print0 | xargs -0 sed -i 's/{% url \([^" >][^ >]*\)/{% url "\1"/g'

That will change your file from :

{% url something.else ass bas %}


to this one :

{% url "something.else" ass bas %}

And now my application can run in Django 1.5.5

Some additional info, i upgrade some of my tools which supported in Django 1.5.5, which are :

+ Django Debug Toolbar 1.0.1

Some warning if you upgrade to Django 1.5.5, your app won't work in Django 1.3, which the url problem we have here.

But to make it still work in Django 1.3.x you must add

{% load url from future %}

in the Template.

So the most annoying job will be change your url to using "urlname" to all you html. If you practice reusable code, cannot imagine how many url you will be added in html. Remember using the sed command.

So to old code compatible with Django 1.3 remember :

1. Add {% load url from future %} in your template using url
2. Always use {% url "urlname" %} in your template after Django 1.5.5

Hope this helps you which planning to migrate to newer Django Release.


Saturday, 8 March 2014

Virtualenv with Virtualenvwrapper power

Work with python, you should know about virtualenv which enable us as python developer to build great thing with different setup.

For the newbie, a quick info is you can run your app with different python version and different package version without version conflict.

For example we have twitterclient application. It build on python2.7 and Django1.3 . Now i need to test it using Django1.4 . So how we do this ?

We not need to uninstall the Django1.3, but we use virtualenv, and use virtualenvwrapper on top of it. It makes developer life easier.

Lets dive in to the usage. First you have pip already installed, if not install it using :

# easy_install pip


Then you install the virtualenv and virtualenvwrapper using pip.

# pip install virtualenvwrapper


This will download also the virtualenv as the dependency.

First thing you must add in your bash environment. In you home directory open your .bashrc with your favorite editor and add :

export WORKON_HOME=$HOME/.virtualenvs

source /usr/local/bin/virtualenvwrapper.sh

For windows install, you add in your windows Environment Variables :

   WORKON_HOME=$USERPROFILE$\.virtualenvs
   PATH = C:\python2.7\Scripts\


The WORKON_HOME tells where the virtualenv will install. When you create a new virtualenv, it will put under WORKON_HOME you specified in the bashrc .
This also can work with zsh and csh.

And you can start using virtualenv. Lets make a new virtualenv :

super@devstack:$mkvirtualenv newbigthing

(newbigthing)super@devstack:$


The output will be like the above. To get out from the env, just type deactivate and you got your normal env.

If you have many environment for project, you can switch easily, just issue :

$ workon newbigthing

$ workon somebiggerthing


Inside the virtualenv you can install python package as usual using pip which is installed by default when the env created.

This is faster then using virtualenv alone, example when you need to go to a virtualenv you need to issue command like this :

$source /env/newbigthing/bin/activate


So long to type, with virtualenvwrapper, just issue workon yourproject

Happy coding with Virtualenvwrapper .

Sunday, 26 January 2014

Resize LVM partition in Debian Linux

I have my Lenovo T430 laptop with Debian Wheezy installed. My setup was a root partition / with 5Gb size, and 70Gb /home partition.  I use Fluxbox desktop in my laptop and happy with the customization i can do.

The problem now is the root partition is getting full as the application installed under root partition. So i need to extend the size. Lucky i use LVM in linux. so i can just resize it. Always keep your installation CD because it is needed now.

Some step i make i documented here so i can refer back to the procedure. here we go the step i was done :

1. Boot using the install CD.
2. Choose advanced - rescue mode
3. Do not select any mount partition, use installation shell mode.
4. Scan the pv using pvscan , then lvscan until you see your LVM partition on disk.
5. Now we got the lvm partition, in my case /dev/HG/root . Then do vgchange -ay.
6. Before resize, do disk checking by e2fsck -f /dev/HG/root
7. Because i want to extend the lvm size do : lvextend -L +5G /dev/HG/root
8. Then we extend the partition : resize2fs -p /dev/HG/root  

Let say we want to reduce the root partition from 5G to 4G, we do the same step until step 7.
If we want to reduce the step different from step 7 which is :
7. Because want to reduce, we reduce the partition first :
     resize2fs /dev/HG/root 3G
8. Then we reduce the lvm partition :
    lvreduce -L 4G /dev/HG/root
9. Then we make the Fs use all the lvm partition prepared :
    resize2fs /dev/HG/root

Well this was my experience with LVM partition resize and extend.

Thanks for reading and hope its helpful to others.

Tuesday, 21 January 2014

Install Node JS in Debian Squeeze

Using my debian 6.0 squeeze, i need to set node js machine.

Debian Squeeze currently don't have any package for node js. So we need to install it manually using the source code.

The node version are v0.10.24 , you can download from www.nodejs.org the source code.

The to prepare the compilation make sure you have the curl package, openssl and SSL lib.

$ sudo apt-get install curl openssl libssl-dev

Then start install node js :

$ sudo ./configure --openssl-libpath=/usr/lib/ssl
$ sudo make
$ sudo make test
$ sudo make install

$node -v  

You will get the node version. And start install node package using NPM, which is included in the source and installed already.


Twitter Delicious Facebook Digg Stumbleupon Favorites More