Mobil Mewah

Salah satu sumber Inspirasi.

Mobil Sport terbaik

Anda pasti bisa memilikinya.

Bermain dengan pesawat

Salah satu ide yang gila, Balapan di udara.

Bermain di angkasa

Apakah ini salah satu Goals dalam hidup anda? anda pasti bisa mencapainya

Tuesday 17 December 2013

Repair WIndows 7 MBR boot record

I have Windows 7 installation, and try to dual boot with FreeBSD 9. Then problem occurs and fail to create the BSD. and then the Windows 7 cannot boot either. The windows partition is still not touched, but cannot boot to windows.

So the question was how to repair the Windows 7 Master Boot Record (MBR) ?

After search on google, there are solution to repair it using the windows 7 instalation disk.

Here are the step done and documented :

1. Boot to the Windows 7 installation disk


2.  Select the Install Now


3. Select the recovery mode


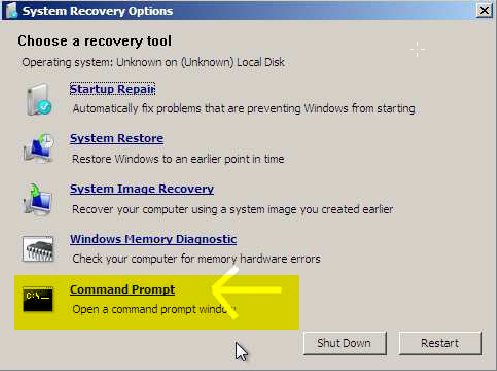
 4. Select the command prompt options.


5. Then you got some msdos prompt like :
    x:\windows\system32>
6. Then type :  dispkart  and press enter
7. Type : select disk 0  and press enter
8. Type : list volume and press enter
9.There will be a list of volume, search for your windows 7 cdrom drive letter.
10. Then type :  exit  and press enter
11. Then go to your windows 7 dvd drive , if it is g then go to g: by type G: and then enter
12. Then type  cd boot
13. Then to restore your MBR do this :
       bootsect /nt60 SYS /mbr  and press enter
14. Then you will be informed about the BOOTMGR volume update.
15. Then exit the msdos, and reboot/ restart.

Don't forget eject your DVD, and your windows7 will be boot and can be use again.

Welcome back to the windows.


Wednesday 4 December 2013

Linux in usb pen drive

Linux is a very powerfull Operating System, and USB pen drive now days are very cheap and affordable with bigger size every year.

What you can do with the old USB pen drive which you have since the day 1 you use USB pen drive, let say the 1 GB USB pen drive you have. To small for storing your image and music files right ?

But don't keep your USB pen drive in the store room. You can use your old USB to boot a Linux Operating System. Yes you can even with minimal 1 GB size of USB pen drive.

You can install many Linux Distro, like Ubuntu , Damn small Linux (50Mb ISO) and many others Linux distros you can have.

This time, we use Linux Damn Small Linux distros and install it in USB pen Drive. To install to USB, we can use windows as the host. Download the tools here and get your ISO files from Damn Small Linux website.

The DSL linux version used was DSL-4.4.10 , download around 50Mb to your local drive, then install using the tools to install to USB pen drive.

Then change your booting preference in the BIOS to enable boot to USB pen drive. But you also can boot the DSL in windows, just read the readme file provided after the installation finish.

Here are the screen shoot of the DSL linux Desktop.

DSL Linux
DSL Linux Desktop


Django error when doing insert

Django error when doing insert
What is the cause of error like this in django + postgresql application :

DatabaseError: current transaction is aborted, commands ignored until end of transaction block

What happen was I import a production database to my development database. Then there are some south migration that not running locally. I found in forum, the problem maybe with the migration or syncdb.

But all already checked, same error still happen when insert to table.

Then check the sql log, the Aha moment was raised, the problem with the table was no value for ID fields which should be auto increment or serial type in postgresql.

So alter the table field and change it to serial type. Then the error was gone.

So the problem was with the table fields. Check your sql log with this type of error. You will find the problem there.


Tuesday 3 December 2013

Postgresql backup and restore

When doing some development, we need a fast backup and restore for database data in postgresql server.

The package provide an easy way to do the backup and restore in 1 command.

You only need the username and password + the database name to be working on.

Here are the backup command signature :


Backup : $pg_dump -U {user-name} {source_db} -f {dumpfile.sql}

Restore: $psql -U {user-name} -d {destination_db} -f {dumpfile.sql}

So this command is straighforward. I dump a 1000 records in 5 seconds.

Also note that the privilege and db owner is follow in the dump file. You must prepare the exact username and database, with no table in it.
This is because the generated dump database not include a drop table command.


But how if we want to backup all database ? Of course we can do it to.

Backup all postgres databases :

We can backup all databases in postgres using pg_dumpall command .

To do the backup run this command :

$pg_dumpall > all.sql


We also can verify if all database is backed up using a grep command :


$grep "^[\]connect" all.sql
\connect blog
\connect facebook
\connect mytweet

What if we want to backup a specific postgres table ? hell yeah you can .

Backup a specific postgres table

The command are :


$pg_dump --table production -U acongbebo -f onlyproduction.sql


Postgresql is a powerfull database you can imagine. support for GIS database already included.

Monday 2 December 2013

Postgresql DB Initialization in FreeBSD

Here are some command that used for administrating postgresql database.

The OS being use was FreeBSD9.1 with postgresql 8.3 


TO enable postgresql service add this in /etc/rc.conf :

postgresql_enable=”Yes”

postgresql_data=”/usr/local/pgsql/data”

postgresql_flags=”-w –s –m fast”

postgresql_initdb_flags=”—encoding=utf-8 –lc-collate=C”

postgresql_class=”default”


To install init db :

#/usr/local/etc/rc.d/postgresql initdb


We don’t have root user and a user in freebsd, so create one.

#su pgsql

#createuser dba    [set as
superuser]

Then change password :

#psql postgres dba

postgres=# ALTER
USER dba WITH PASSWORD ‘newpass’;

To create database :

#createdb mydb –o acong

[o] is owner of db

There we are. The database mydb ready to use and access from local host only.

Later on how to do backup and restore in Postgresql fast.

cacti time problem

Yesterday, I have a migration for may cacti NMS server from one Virtual Machine to other Virtual Machine. The problem is that the time error when the VM migrated.

This make the graph cannot be updated by the cacti pooler.

The time is shifted forward 3 years. If only 24 hours shift, we can just wait for the 24 hours time difference. But 3 years, its unsusable. So the solution is only delete all rrd data and crso bad, create from scratch.

This is so bad, as I don't have any backup. Last 1 year performance history data was gone.

This is bad with cacti, if only had a protection to stop the rra being updated by the pooler when time is shifting to far away.

I don't know if this can be happen with other monitoring tools like zabbix or zennos.

I like to use zabbix, but the setup to much and I have no time to try it out.

Lesson learned with CACTI :

  1. Backup your RRA data once every week
  2. Stop the pooler work when do some migration and time changing routine
  3. Always make sure you have backup.
Hope you can learn from this experience also.

Sunday 1 December 2013

Upgrading Django 1.3 to 1.6 road blocks

Upgrade Django 1.3 to 1.6
So I try to upgrade my project to use Django 1.6 .

What I found is some setting that change, and to specific to note in the django Documentation. So I make notes on what have change and need to adjust in my django app configuration.

manage.py

The manage.py files. Now start from Django 1.4 there was a major change. One of the aim was to overcome the double import file in python.

The recommended manage.py are :

#!/usr/bin/env python
import os
import sys

if __name__ == "__main__":
  os.environ.setdefault("DJANGO_SETTINGS_MODULE", "{{ p_name }}.settings")
  from django.core.management import execute_from_command_line
  execute_from_command_line(sys.argv)

Here you change the {{ p_name }} to your project folder. And the manage.py should be move up one level of the project folder.

So the layout should be :

project
|--Blogs
   |-- urls.py
   |-- settings.py
   |-- models.py
   |-- views.py
|-- manage.py

urls.py

The urls.py import change. In Django1.3 we use :

from django.conf.urls.defaults import patterns, include, url
Now starting Django 1.4 there were no more defaults in urls. So we change to :

from django.conf.urls import patterns, include, url

To make it compatible with previous version of Django1.4 you can use try block :

try:
  from django.conf.urls.defaults import patterns, include, url # django1.3 support
except:
  from django.conf.urls import patterns, include, url


settings.py

If you implement the resusable app concept, your settings will have some application level configuration variable in the project settings.py which you can access from application via settings.import . But after Django1.4 all change. 

If your application need access configuration variable in settings.py , this what you should change:

from settings import RESULTS_PER_PAGE , SITE_NAME, SITE_DESCRIPTION

To new way :

from django.conf import settings
  RESULTS_PER_PAGE = settings.RESULTS_PER_PAGE
  SITE_NAME = settings.SITE_NAME
  SITE_DESCRIPTION = settings.SITE_DESCRIPTION

if you want to keep compatibility with < Django1.4 :

try:
  from settings import RESULTS_PER_PAGE , SITE_NAME, SITE_DESCRIPTION
except:
  from django.conf import settings
  RESULTS_PER_PAGE = settings.RESULTS_PER_PAGE
  SITE_NAME = settings.SITE_NAME
  SITE_DESCRIPTION = settings.SITE_DESCRIPTION

And another thing to change in settings.py in TEMPLATE_CONTEXT_PROCESSOR section :

# old
TEMPLATE_CONTEXT_PROCESSORS = ("django.core.context_processors.auth",
                              
)
# new
TEMPLATE_CONTEXT_PROCESSORS = ("django.contrib.auth.context_processors.auth",
                               
)


So the change I found out only :

  1. Manage.py file location
    This change the whole config and directory layout of a project
  2. URLS import in urls.py
    No more django.conf.urls.defaults , change to django.conf.urls
  3. Import Settings Variable
    Need other way to import settings variable. What I learn that any reusable app should not depends on the project settings.This give a loose app and project relationship.
And the result, I bumped with more configuration that had to change, like the context processor utils?
I decide to roll back, and better use the new Django1.6 with new project anyway.

And maybe should upgrade 1.3 to 1.4 first.

Updates :

I try again and bumped with the context processor utils, the problem was the django.conf import. I use import settings for load all the default knob in my application, now i use :

from django.conf import settings  

Now my apps run in django 1.4 . Next will be upgrade to django 1.5 and I will posting my findings.

Django Version 1.6 release

Recently Django released Django 1.6 release in 6 November 2013. While I am still using Django 1.3 in my production server.

Looks so many improvement and site layout arrangement in newer version and make the temptation to try it out.

I have the options to upgrade to the newer version. But what makes me stop is there are to many change in the process. Maybe better to use the newer version with new project because the layout is changes to much.

In my deployment and development, I use the Reuse application methodology. So i hope the change is only in the project layout, but the app layout is still the same.

What I encounter in Django 1.3 lack of is, the sql batch insert. In one of my project, I need to update many rows at once, and the ORM doing update to database one at a time.

In Django 1.4 there is sql batch insert functionality which is good news.

And in Django 1.6 that I read from realese notes, the update are :

  • SQL persistance connection
  • Admin interface activated by default
  • Change in Django Transaction Handling
  • Discovery of test in any test module
  • Support BinaryField in model field
  • Model.save() algorithm changed
    This minimize the queries sent to sql server to 1 command only, before 2 sql command when save is called
For the Details you can see in the Release Notes of Django sites.

Sunday 20 October 2013

Links to research data

I made this list for my own purpose to get research and paper information i found in Internet.

Hope usefull for you who found this page :

http://ageconsearch.umn.edu

Friday 4 October 2013

Battle of the Year 2013 The Movie


Today i just notice about a movie about dance sport competition in one of online video website and watch the movie trailer. It is interesting because in the movie, the story about the sport, the coach and the team.

This what make me interested to watch the movie at first place

" A good coach can take his team to championship "

But this 

"A great coach can get any team in any sports to the TOP"

This something that greatness produce, and i think many things i can learn from this movie and also it is entertaining to see a dance competition and the choreographer . It makes me fell some spirits to do more in daily life.

So just check out your self the movie trailer


Battle of the Year Trailer Chris Brown 2013 Movie - Official [HD]

This will be my video collection . Hope you enjoy the information.

Tuesday 17 September 2013

Get Mobile user access exchange server

Every administrator of exchange server happy with the GUI microsoft provided, but still command line is the best and efective way to get information from exchange.

We can scripting and automate the way we get information and dump it to a file as we like.

Come the Power Shell for exchange to the rescue. We can use Power Shell to query the exchange server to get any information we need which already provided.

Here we need to get the exchange user which using mobile device to access their inbox. The simple command are :


Get-Mailbox -ResultSize:Unlimited | ForEach {Get-ActiveSyncDeviceStatistics -Mailbox:$_.Identity} | Where {$_.LastSuccessSync -gt '2/15/2007'}
 

Then if we wan to get more granular result, we can pipe the result to another command.


Get-Mailbox -ResultSize:Unlimited | ForEach {Get-ActiveSyncDeviceStatistics -Mailbox:$_.Identity} | Where {$_.LastSuccessSync -gt '2/15/2007'} | Sort-Object -Property DeviceType,Identity | Select-Object @{name="EmailAddress";expression={$_.Identity.ToString().Split("\")[0]}},DeviceType | Export-Csv -Path:"C:\Temp\MobileDevices.csv"

With thePower Shell tools, administrator can have a time saver activity. Imagine if you need to search in 1 million of exchange user. Would you go to the Exchange GUI ? even if the GUI provide this kind of reporting.

Source of doc :
http://knicksmith.blogspot.com/2007/03/dst-and-mobile-devices.html

Tuesday 10 September 2013

Optimize squid caching Hit Rate

To optimize squid cache and get a bigger cache Hit ratio , we need to tune some configuration. The default configuration just run without optimization in cache usage and bandwith saving.

First, if our target is have a bandwidth saving, we need to configure the cache_replacement config.

The options are :

Least Recently Used (LRU)
This is the default method use by squid for cache management. Squid starts by removing the cached objects that are oldest (since the last HIT). The LRU policy utilizes the list data structure, but there is also a heap-based implementation of LRU known as heap lru.

Greedy Dual Size Frequency (GDSF)
GDSF (heap GDSF) is a heap-based removal policy. In this policy, Squid tries to keep popular objects with a smaller size in the cache. In other words, if there are two cached objects with the same popularity, the object with the larger size will be purged so that we can make space for more of the less popular objects, which will eventually lead to a better HIT ratio. While using this policy, the HIT ratio is better, but overall bandwidth savings are small.

Least frequently used with dynamic aging (LFUDA)
LFUDA (heap LFUDA) is also a heap-based replacement policy. Squid keeps the most popular objects in the cache, irrespective of their size. So, this policy compromises a bit of the HIT ratio, but may result in better bandwidth savings compared to GDSF. For example, if a cached object with a large size encounters a HIT, it'll be equal to HITs for several small sized popular objects. So, this policy tries to optimize bandwidth savings instead of the HIT ratio. We should keep the maximum object size in the cache high if we use this policy to further optimize the bandwidth savings.

So the configuration can be tuned, if you need bandwidth saving or Hit Ratio, its up to you the administrator
Here are the config for saving more bandwidth :

memory_replacement_policy     lru
cache_replacement_policy heap LFUDA
  
Then we need to cache the static files usually found in website as .css / .js / .jpg / .png / .gif . Usually the file rarely changed even in a dynamic websites. Some of the website provide caching information in the response the webserver provide, but sometimes they are not.

We can also override the caching information returned from a website, so we can utilize our cache server more optimal.

The config will be in refresh_pattern . With this, we can enforce the caching of some file extension, because squid use regex to match the rules we create inside squid.

The default signature are :

refresh_pattern [-i] regex min percent max [OPTIONS]

So for example we want to cache all jpg file and ignore caching options provided by the webserver response in the header, so the config will be :

refresh_pattern -i .jpg$ 0 60% 1440 ignore-no-cache ignore-no-store reload-into-ims

The meaning areit will match .jpg file with case insensitive, min time consider fresh is 0 min, and the age of file is 60% more from the Last-Modified-Date in header , and the age is more than 1440, the file considered stale in cache.

The other params is squid will ignore the header information , like ignore-no-cache , ignore-no-store .
The reload-into-ims will make squid to convert the no-cache directive in HTTP Headers to the If-Modified-Since Headers. This will used when the Last-Modified headers not available from webserver response.


Get User in Active Directory geek way

In Windows Active Directory there are many ways to manage the data. The easiest way is use the Gui console provided by Microsoft and had been a friend to many of Windows Administrator.

But how if we need to get many of the user in single command ? Here are the command line still the most favorite choice of smart and Lazy administrator.

Here are some command to interact with Active Directory using Dsquery command. Just drop to MSDos box and query it.

To get all Group in Active Directory :

dsquery group -limit 10000 > groups.csv

To get all Users in Active Directory :

dsquery user -limit 10000 > users.csv

To get Users which  not logon in last 4 weeks :

dsquery user -inactive 4

To get all Members of a Group :

dsget group "CN=Fin,DC=asu,DC=com" -members

To get a user details in Active directory :

dsquery user -name Admin

I will post more of the usage and updated in this articles. Stay Tuned :)

Tuesday 27 August 2013

Query disabled user in Active Directory

Some times we need to use programing to generate something more faster, especially if you handling more than 100 records of data.

This time i need to query user that are disabled in Active Directory. Sure you can see it by search in Active Directory control pane, but i need it to be exported in csv so i can handle it in excell format for futher processing.

So here are the script to know who is disabled in Active directory and save it to a csv file.


Const ADS_UF_ACCOUNTDISABLE = 2 
  
Set objConnection = CreateObject("ADODB.Connection") 
objConnection.Open "Provider=ADsDSOObject;" 
Set objCommand = CreateObject("ADODB.Command") 
objCommand.ActiveConnection = objConnection 
objCommand.CommandText = _ 
    ";(objectCategory=User)" & _ 
        ";userAccountControl,distinguishedName;subtree"   
Set objRecordSet = objCommand.Execute 
  
intCounter = 0 
Do Until objRecordset.EOF 
    intUAC=objRecordset.Fields("userAccountControl") 
    If intUAC AND ADS_UF_ACCOUNTDISABLE Then 
        content = objRecordset.Fields("distinguishedName") & ",disabled" 
        writeToFile(content)
        intCounter = intCounter + 1 
    End If 
    objRecordset.MoveNext 
Loop 
  
WScript.Echo VbCrLf & "A total of " & intCounter & " accounts are disabled." 
  
objConnection.Close 

Function writeToFile(content)
    Const ForAppending = 8 'for logging
    Dim objFSO, objLogFile 'for logging
    fname = "c:\users\masterUser\documents\disabledUser.csv"
 Set objFSO = CreateObject("Scripting.FileSystemObject")
 Set objLogFile = objFSO.OpenTextFile(fname, ForAppending, True)
 objLogfile.WriteLine content
 objLogFile.Close
 set objLogFile = Nothing
 set objFSO = Nothing
    writeToFile = "success"
End Function

So you should expect your file in c:\users\masterUser\documents\disabledUser.csv

Hope this help someone like me.


Sunday 11 August 2013

Options list with angular.ui bootstrap

I recently need to generate an options list, which is queried before from database.
This is common practice in web / application development, where system provide the value for the options which is created by admin of the application.

So in angularJS all purely javascript, we can use for loop, but takes time. We are smart developer right?
Here how I did this using angular.ui.bootstrap component .


We assume the data will be :

var categories = ['red','green','blue'];


The data will be generated from your database. How to generate it using REST, is out of the topic for now.

And in the view :

  <select name="label" id="label" data-ng-model="article.label" data-ng-options="cat for cat in categories"> </select>


This will generate the select options :

<select >

  <options value=0> red</options>

  <options value=1> green</options>

  <options value=2> blue</options> 

</select>


The hardwork done by the data-ng-options directive of angular.ui.bootstrap.

This save around 15 minutes of coding I think, with just 1 line of code to generate the options, and plus it done in client side, the BROWSER. Not in server anymore mamen. Welcome to the real thin client distributed computing a.k.a Browser apps.

Your server only handle the database operation via REST api for more scalability.

Go to the next level, see you on other articles.

Monday 5 August 2013

Windows Domain controller Demotion

I have a windows 2003 Domain controller. I have 3 of the DC from previous installation. Now I need to remove this domain, and I think need to do some clean up with proper way, cannot just shutdown the Domain controller. This is because the Domain Controller have child domain and it getting harder to remove.

I documenting the process in here for reference.

First in windows 2003 Domain we can have 5 role in 1 server or it called FSMO role. We need to check it belongs to which server and make sure it transfered correctly to other server before it will be the last server to remove.

First to check the role server have run this command :

c:\>netdom query /domain:domain.com fsmo
Schema owner                      server1.domain.com

Domain role owner                server2.domain.com

PDC role                               server1.domain.com

RID pool manager                  server1.domain.com

Infrastructure owner               server2.domain.com

Then we need to demote the server using dcpromo command.

  1. Run DCPromo
  2. Select if this server is the last domain controller in the domain
  3. Enter your administrator password
  4. Then wait until complete
  5. Restart the server
  6. Now server will be member of the domain if not the last domain controller
Then after complete, confirm again the domain FMSO using netdom if the role all transfered to other domain controller server.


NodeJS application Deployment

NPM Logo
NPM Logo
Recently I prepare to deploy a NodeJS application for server side application. There are some dependency and prerequisite software to be installed, like mongoose lib, ExpressJS lib, and other lib in NodeJS environment.

To make this deployment easy, NodeJS come with NPM, which can install all the needed library from a single file called package.json . We just list all the dependency needed by the application, in development and in production environment. This makes life easier for programmer like us.

Here are some example of the package.json :

{
  "name": "AwsomeFaqSite",
  "version": "0.0.0",
  "dependencies": {
    "express": "~3.1.0",
    "path": "~0.4.9",
    "mongoose": "~3.5.5",
    "passport": "~0.1.17",
    "passport-local": "~0.1.6",
    "connect-memcached": "~0.0.3",
    "helenus": "*",
    "node-uuid": "*"
   },
  "devDependencies": {
    "karma": "~0.8.6",
    "grunt": "~0.4.1",
    "grunt-contrib-copy": "~0.4.0",
    "grunt-contrib-concat": "~0.1.3",
    "grunt-contrib-coffee": "~0.6.4",
    "grunt-contrib-uglify": "~0.2.0",
    "grunt-contrib-compass": "~0.1.3",
    "grunt-contrib-jshint": "~0.3.0",
    "grunt-contrib-cssmin": "~0.5.0",
    "grunt-contrib-connect": "~0.2.0",
    "grunt-contrib-clean": "~0.4.0",
    "grunt-contrib-htmlmin": "~0.1.1",
    "grunt-contrib-imagemin": "~0.1.2",
    "grunt-contrib-livereload": "~0.1.2",
    "grunt-bower-requirejs": "~0.4.1",
    "grunt-usemin": "~0.1.10",
    "grunt-regarde": "~0.1.1",
    "grunt-rev": "~0.1.0",
    "grunt-karma": "~0.3.0",
    "grunt-open": "~0.2.0",
    "grunt-targethtml": "~0.2.4",
    "matchdep": "~0.1.1",
    "grunt-google-cdn": "~0.1.1",
    "grunt-ngmin": "~0.0.2"
  },
  "engines": {
    "node": ">=0.8.0"
  }
}


We define the package name of our application which is AwesomeFaqSite , version, and the dependencies of the application. Then we just install all in the new server with just running

  npm install

The npm will look for package.json for default, and install all the application defined in the package.json .
All the required lib will be installed under the same directory level under node_modules directory.

From my experience with other programming language, this npm method is the easy and fastest way to deploy new development or production environment.

Bravo NodeJS community and the Npm developer. in Python world there are pip install and pyenv which look like npm method.

Hope this help someone like you who read this post.

Leave a comment and let me notice your visit.

Sunday 4 August 2013

AngularJS and ExpressJS Basic Auth

So I have successfully implement the Basic Authentication method with AngularJS as frontend , and using ExpressJS as my REST service provider.

Lets dig in the specification first which are :
  1. The client will have to sent the Basic authentication header in every XHR request
  2. The XHR request will be using the factory $resource in AngularJS
  3. The REST service will need to check the Authentication header in every request
  4. If no authentication header available, it will response with 401 code
  5. If the authentication header available, check against user database, if not match response with 401 code
  6. If credential match, continue with next operation
  7. The check will be implemented as a middleware to every request
 First, here are the angular code :

Here are the factory User in services/user.js :

'use strict';

angular.module('userServices', ['ngResource'])
  .factory('User', ['$resource','globalData',function ($resource,globalData) {
    // Service logic
    // ...
    // Public API here
    var url = globalData.getApiBaseUrl();
    return $resource(url + '/user/:id/',{id: '@_id'},
      {update: {method:'PUT'}

      }
    );
  }]);

Here are the globalServices, in services/globalData.js

angular.module('globalServices', [])
  .factory('globalData',['$cookieStore','$http', function ($cookieStore,$http) {
   getAuthToken: function () {
        var auth = window.btoa(this.getUser()+':'+this.getApikey()); //inject the user and password/apikey here
        $http.defaults.headers.common['Authorization'] = 'basic '+auth;
        return ;
      },

}]);


And in every controller you have call the method to inject the header. here are UserCtrl in controllers/user.js :

angular.module('myapp')

 .controller('UserCtrl',['globalData','User', function (globalData,User){

      var q = globalData.getAuthToken();

      $scope.user = User.query(q);
}


With this, everytime angular request data to REST server, there will be authentication header which you will get from login before or you have it in your config.

And now in the server , we process the request header in every request which we want to authenticate before processing.

In express, we use module for code organization, and we put it in authapi.js module :

var User = require('../models/users');

module.exports = {
  checkApiAuth: [
    /* This work as middleware , before all controller run this will run
     * will check the user & api query param to db
     * if they are correct, will be found in db
     * if not found, will send 401 / unauthorized
     * since 9 June 2013
     */
    function (req, res, next){
      var header=req.headers['authorization']||'',        // get the header
       token=header.split(/\s+/).pop()||'',            // and the encoded auth token
       auth=new Buffer(token, 'base64').toString(),    // convert from base64
       parts=auth.split(/:/),                          // split on colon
       username=parts[0],
       apikey=parts[1];
       console.log('headers :'+header+' : '+ username+':'+apikey);
       if (!username || !apikey){
        res.send(400);
      }
      else{
         //process to check the database info

            if (apikey === db.apikey){
              return next(); //here we will process next function called in routes module
            }else{
              res.send(401);
            }
      }
  }]
} 


And to use it in every request, add it in router module of your expressjs application.
Here are ./routes/user.js

/*
 * User Routes
 */

var userCtrl = require('../controllers/users');

module.exports = function(app, apiAuth ){
    //API exposed
    app.get('/api/user', apiAuth.checkApiAuth, userCtrl.getList);
    app.post('/api/user',  userCtrl.createWApi);
    app.put('/api/user/:id',apiAuth.checkApiAuth, userCtrl.update);
    app.get('/api/user/:id', apiAuth.checkApiAuth, userCtrl.read);
    app.delete('/api/user/:id', userCtrl.delete);
}


And in the app.js for expressJS initialization add :

  var apiAuth = require('./lib/authapi');

  require('./routes/user')(app,apiAuth);

Saturday 3 August 2013

Authentication in REST Service

Today I try to make authentication working in accessing REST services. I use ExpressJS to server the REST service, of course with NodeJS.

There are some options I found to be interesting and to be considered and I will share and Document it in here. Hope this will be useful for other programmers out there.

There are 2 options I explore to make authentication :
  1. Include the authentication information in the query url.
    For example, http://api.myservice.com/api/v1/tweet/?user=themaster&apikey=9294023984987249
    This is the easiest way to generate in any application and is common in all web application
  2. Include the authentication information in the HTTP request Header.
    With this method the credential will be available in the request header from client. This one need some digging and knowledge to generate the HTTP header. For example :
    1. Accept:
      application/json, text/plain, */*
    2. Accept-Encoding:
      gzip,deflate,sdch
    3. Accept-Language:
      en-US,en;q=0.8
    4. Authorization:
      basic bXVsaWFudG86YmEzMWRkNGNkZTRjNGNhMzRhMGMyODMyZDJjZDQxZTU1NmM0YWRiMg==
    5. Connection:
      keep-alive
With these options, there are some good and bad included in the implementation. Lets dig more into it and analyze it based on our needs.
First, consider caching by the public cache. If your url contain query parameter, it will not be cached. So the first options will be not benefit from public cache server which usually available near the user provided by the ISP provider or company infrastructure or local cache.
With the second option, there will be no query parameters in the url, so any HTTP Get operation will benefit from caching.

Second, consider the security, you must use HTTPS if you don't want any one who can analyze traffic get your credentials. If you got your REST service a HTTPS , then this is ok. no need to think about Man in The Middle attack.
Also with the second options, actually you still have security issue, because the authorization encoding only using Base64 method which can be generated back to plain text. But with this, at least your credentials not shown up in the URL wildly.

So with this finding, I consider to use the second options, which is using HTTP Request Header Basic Authentication. But I wont use the challange response method to the user requesting, because the request will come from a XHR ajax request. So just return 401 if the authorization header is not there or not match.

If you want your user input the credentials, just challange the request with WWW-Authenticate HTTP HEADER response.

And also we will got cleaner URL without the query parameter exposed to blind eye scanning the HTTP request.

Next I will post the code to do this basic authentication in server and in AngularJS application.

Stay Tuned.
 

Cassandra DB for High Availability

Cassandra DB
Cassandra DB Logo
I am looking for a database which will eliminate headache when the data growing and when need to scale the server. I want to be able do scaling Horizontal easily and with any size of physical server. Also want to have added capacity as I add new database node to the cluster. Is this possible with old school relational database like Oracle, MSSQL, MYSQL, PostgreSQL .

From my experience even using vendor supported database, the solution will be dump more money to your machine, which is add processor and bigger RAM. With increased data let say 4 years of working data, you will get performance hit when query data from your database. How much you can add to a physical machine.

I have testing some of database with the above mentioned options, like MonggoDB , CouchDB, Cassandra.
The one I have play with is MonggoDB which is easy to work , with javascript application like NodeJS , because the data output already in JSON, which common usage in javascript world.

I also test Cassandra, and quite need more effort to know because the concept is different, using Column value , as document database in MonggoDB.

What I need is a database that can easily to scale and can handle all the load when the demand are increasing. I tie the Database with REST API service as the backend interface to application. The Front End will be using Single App javascript using AngularJS.

With this, I separate the Data service with the front end. In the end the front end can be an mobile app consuming my REST API with Cassandra DB as persistence storage.

Later I will post my finding when using Cassandra DB as my notes here in development.


Friday 2 August 2013

Using WMI In windows environment

In windows, there are some tools provided by Microsoft called Windows Management Instrumentation (WMI) . Its a service which included in windows server to access the magic in the server, like processor, disk status, network status, OS, software installed and other low level information to windows.

It is available in Windows XP, windows 7 , Windows server 2003 and up. But in windows server 2003 the WMI is not installed by default. You should install the WMI provider.
To install manually go to control panel >> add remove programs >> add/remove windows component >> management and monitoring tools >> WMI Windows Installer Provider

With the WMI installed, we can query the OS locally or from remote machine using VBScript. This is handy for network admin, system admin who want to know the status of their server automatically by script access.
Actually many monitoring application utilize this service. If you can do programming, you can build a product from the service.

I will give some example that i have to query the os and the application installed in the server. Here are scanner.vbs

strComputer = "server1"

Set objFSO = CreateObject("Scripting.FileSystemObject")

Set objWMIService = GetObject("winmgmts:" _
 & "{impersonationLevel=impersonate}!\\" & strComputer & "\root\cimv2")

Set colOSes = objWMIService.ExecQuery("Select * from Win32_OperatingSystem")
   
For Each objOS in colOSes
    strFileName ="c:\Microsoft_Installations\"& objOS.CSName & "_Microsoft_Installation.xls"
    hostname=objOS.CSName
    os=objOS.SerialNumber & " " & objOS.Caption & " " & objOS.Version & " " &       objOS.ServicePackMajorVersion & "." & objOS.ServicePackMinorVersion
    install_date=objOS.InstallDate

Next


Set objFilei = objFSO.CreateTextFile(strFilename, True)
objFilei.WriteLine os & vbtab & _
install_date

objFilei.Close

The script will create a file defined in strFileName and get a OS information with serial number and the OS Version.

Hope this help someone who need scripting with Windows WMI.

Thursday 1 August 2013

Do we need caching in AngularJS

Angular JS
Do we need caching in Angular JS ? Caching in a Web based application can dramatically improve the performance and application loading. But it also hard to to invalidation. With Ajax application like AngularJS, I thinking about do we need cache the ajax response from REST api backend.

After some reading and search about web caching, from Web Caching for the credits, I conclude that no need to do the cache in tha application logic. Why ? Because HTTP1.1 have caching method and cache invalidation, and every modern web browser comply to it. The only problem need to tackle is the REST server configuration to make the REST api cache friendly.

Base on HTTP1.1 draft , cache described as  A program's local store of response messages and the subsystem that controls its message storage, retrieval, and deletion. A cache stores cacheable responses in order to reduce the response time and network bandwidth consumption on future, equivalent requests. Any client or server may include a cache, though a cache cannot be used by a server that is acting as a tunnel.
Most developer want to use cache in the application logic is to improve the performance and spare the database server work, and also to save bandwidth use to request the data. Of course my aim to use Cache is to make performance improvement in the application loading and ease the server burden to process the same data again and again.

I test my AngularJS SPA web application which fully ajax, and request all data come from a backend API via REST service. The result is when the user first load the data, the request is served from the REST services. And after the second request, it served from the local client cache of the web browser. This of course satisfy the need to make application load faster and ease the server workload.

But, the web browser still need to make a connection to the REST api server to check the validity of the cache, and do some invalidation if needed. But no data transfer taken place, the response just 304 Not Modified , which means the data not changed and you can serve it from your local cache. This is valid for proxy server cache and other cache machine out there which comply with HTTP1.1 specification.

And for the invalidation, when I do POST method to the url, the GET method will be refreshed by the cache, so invalidation is done without single line of code. This is also work with DELETE and PUT method, as long as using the same URL resource , like http://www.myserver.com/api/article and use different method on it.The cache of a resource will be invalidated if there are POST method action to the same resource. This why also we need to follow RESTFULL standart for cache friendly API.

And the time needed to check the cache validity to server only takes about 50ms or more depend on your server. This is just a great way to leverage the cache infrastructure already deployed out there in the internet, especially the Web Browser technology. No need to add cache logic in your app and got mess with cache invalidation. Just let the browser and cache machine out there to handle the cache, as long as your server is cache friendly.

This is not the same with standart web application which reload every time user request a page, because the server need to generate the content again, like get from database, process the template and others job before request sent to web browser.

But doing caching inside an application is a not easy task. I have been there with PHP, and Django especially using Memcache. It is fast, but need to maintain the cache state.

So I will not to use caching in the angularJS code, just let the HTTP1.1 caching mechanism do it. I have try the $cacheFactory method, and can do the cache and not to check the API server for the validation, but the invalidation is just a more coding works. Maybe for other purpose will use these cache method.

Happy Coding.

Wednesday 31 July 2013

Form Validation in AngularJS

Every Web application will need a sort of validation before user enter submit button. This usually makes a round trip travel of the data to the server.
For example user fill form, then submit the form to the server. After checking in server, there were errors and the form sent back to the user with error message for the user to fix.

This give an unnecessary round trip request to the application server. In AngularJS, we minimize the roundtrip request to the server, because AngularJS tend to be Ajax application with REST api backend.
We validate the form input from the user before submitted to the server. But remember, we cannot depends on client side validation, which is easily to bypass. We just provide a better user experience in the application by giving error message before user even submit the data to the server. This also ease the burden in the server to process invalid input.

AngularJS provide a great way to validate the form. It is easier to do a form validation with interactive user experience using javascript. You have done the validation in client side using javascript plugin right? Many type of plugin i have used, but i am not bother to know how it works, just include the plugin and do what it specified.

With AngularJS we can do better and more interactive. So now move on to the code.
Let say we have a form :

  <form id="ArticleForm" class="form-horizontal" novalidate method="post" name="ArticleForm"  ng-submit="saveArticle()">

    <legend>

      <h2>

        <span data-ng-bind="page.action">

          Article

        </span></h2>

    </legend>

   
 <div class="alert alert-{{page.result}} ng-cloak" 
data-ng-animate="'myFade'" data-ng-show="page.showMsgBox" 
data-ng-cloak>

      <button class="close" data-ng-click="page.showMsgBox=false" type="button"></button>

        {{page.message}}

    </div>

    <div class="control-group">

      <label class="control-label">

        Title

      </label>

      <div class="controls">

        <input id="id" class="" type="hidden" ng-model="article._id" name="id"></input>

       
 <input id="title" class="input-xlarge" type="text" 
ng-model="article.title" placeholder="Title" required name="title" ></input>

        <span ng-show="ArticleForm.title.$valid"><i class="icon-checkmark-3-green"></i></span>

       
 <span class="error" ng-hide="!(ArticleForm.title.$error.required 
&& ArticleForm.title.$dirty)"><i 
class="icon-cancel-3-red"></i>&nbsp;Please enter Article 
Title</span>

      </div>

    </div>

  <div class="control-group">

       <label class="control-label"></label>

       <div class="controls">

        
 <button class="btn btn-success" 
data-ng-disabled="!ArticleForm.$valid" ng-submit="saveArticle()" 
data-ng-bind="page.action" data-ng-hide="noSubmit" type="submit">

           Create Article

         </button>

       </div>

     </div>

</form>


Lets analyze the form :
  1.  Make sure add novalidate directive in form
    This will prevent default HTML5 validation 
  2. Use requred in the input control
  3. To use the validation status, there are 4 status of the input
    $pristine   : The input not have been touch
    $dirty       : The input already modified by user
    $valid       : The input is valid
    $invalid    : The input is invalid
    To access the variable :
    ArticleForm.title.$pristine
    ArticleForm.title.$dirty
    ArticleForm.title.$valid
    ArticleForm.title.$invalid
  4. After user submit, you will need to reuse the form and reset the form validation status. you can just reset the pristine status of the form.
    $scope.ArticleForm.$setPristine();
The $setPristine() function is usefull to reset all the status, it means also reset your form alert. This function can be found after angular 1.1.1 .
Here are the patch AngularJS $setPristine() update  you can see what it do inside AngularJS.

My selft use it to reset the form validation status to a new fresh state as it just loaded.

And also for the bonus the css style for the form :

.error{
color:red;
}
span.ok, span.ko
{ display:none; float: right; font-size:34px; margin-top: -13px;
}
input.ng-pristine{
border:1px solid Gold;
}
input.ng-dirty.ng-valid
{border:1px solid Green; }
input.ng-dirty.ng-invalid { border:1px solid Red; }
input.ng-dirty.ng-valid ~ span.ok { color:green; display:inline; }
input.ng-dirty.ng-invalid ~ span.ko { color:red; display:inline; }


Just remember, you still need the input validation in server side.

Monday 29 July 2013

VIM Editor for productive programmer

If you are in linux world and do some basic hacks, the command line you will have by default will be Vi .
Vi Screen Shoot
Vi Editor
There are some command line which more extensible and many plugin, called VIM. This editor not just text editor. In first attempt you will see this VIM application is only simple notepad editor in windows. This is the basic VIM without any plugin loaded. You will like VIM later on.

What a programmer want is of course some smart text editor that can help them typing faster for their code and also give many shortcut which are extensible.
Some of them are line numbering, auto completion, syntax highlighting, and many other more, which of course some professional code editor is not cheap.
With VIM, which is more extended than Vi , VIM available to many other Operating System.
Every basic feature VIM have, usually available in Vi .

My self use VIM not long ago, and start to learn it to make my coding activity even smarter and productive.
And there are millions of VIM plugin out there which can make your life easier as a programmer.
VIM Editor

One of the plugin manager I use with VIM is pathogen. It is easier to use plugin with pathogen, just drop the plugin to the folder, and it will auto load the plugin when VIM start.

I had been using Edit+, Notepad++ , and this time VIM, and I really like VIM for the job. Even you can have your own auto completion in make you type faster than ever. Try it with standard HTML snippet.

So what do you think about VIM , I like also to hear your opinion. Drop me your comment.

Next I will blog about the tools I found most productive to use. Happy VIM !

Tooltip on Twitter Bootstrap

Just now I managed to use Tooltip on Twitter Bootstrap theme for my website. I follow just the template in the example

    <a href="#" rel="tooltip" title="first tooltip">hover over me</a>

But nothing happend as expected. All the file included there, the bootstrap.js and the bootstrap.css with complete feature in it.
Check inside the bootstrap.css, there are entry for tooltip class. Also in the bootstrap.js there are handler for Tooltip.

Searching around via google, i found out that Bootstrap ToolTip feature cannot be used just like that, you need to add some invocation in the head, when document.ready function.

Here are the script to make tooltip activated :

<script type='text/javascript'>
     $(document).ready(function () {
     if ($("[rel=tooltip]").length) {
     $("[rel=tooltip]").tooltip();
     }
   });
</script>

And that's it, the tooltip now active and as what expected. Why this is not stated in the example. Documentation really need to be updated. I documented this one in this blog as my own preference and if you ever found it, surely it will help you.

Sunday 28 July 2013

How to use syntax Highlighter in blogger

If you are a Developer and do blogging and post your code inside your blog, you want to have it display nicely and also it will help others see your post with smiling face.

There are some utility for this, called syntax highlighter. We can use it in blogger, just insert some javascript in your HTML Head in your blogger template. The code base on JavaScript and almost every blog I found use it. Here are the code to add :


The main file is the shCore.css , shCore.js

Then in your code just add <pre class="brush: js"></pre>

And make sure the javascript is called :


If you also want to contribut to the development or just want to see what happening inside the code just go to SyntaxHighlighter GitHub 

The Brush type supported are here

Improve web application loading

So you have a web application, and it contains HTML in it. The size for each page around 300kb or some have 800kb .Whatever the size your application server generate dynamically, it needs time to load, consume network bandwidth in server, memory usage in server, also consume resource in routers, firewalls, client modem, client CPU and memory and so on.

You can say for client is not to big. They have cache locally , every web browser now have local cache. But still the browser need to check with the web server if there are any change in the content before load it from the cache. It still consume resource.

Now shift to the server point of view, the Web Server and application server. Even a little size squeeze in the HTML output will give a significant resource savings in every part of the infrastructure which process it.
Let say 300Kb HTML page loading for 1 request. What if there were 100 connection, 10k connection. The number become large enough and can become serious bill in the end of the month.

Some developer say bandwidth is cheap, CPU is cheap, but i don't agree with this after reading a book "Release IT" . I remember the CPU cost is cheap told in a Framework community in CakePHP for the excuse of slow performance framework. That not said the PHP language slowliness compared to other language.

So what can we do to improve our web application loading. What i have done is remove all white space in the HTML. All the unneeded white space, tabs, new line, can give significant improvement in size delivered by your server.
Only from white space and new line also tabs, which is common in HTML page to be used and created by Developer and designer, from 200Kb trimmed into 150Kb size. 50Kb is a lot if you serving 10k connections from your web servers.

So what is the tools out there to be use, here are some of my tools i found be useful :
  1. Use Htmlmin from Grunt package
    What is Grunt, it will be another topics to blog. It ease the work of you as developer. Smart developer are lazy for sure. In Grunt there were many package for this type of work. One is Htmlmin
  2. Use Cssmin from Grunt package
    Besides trimming HTML file, you can also trimming CSS files in your web application.
  3. Activate Gzip compression in your WebServer
    In NGINX you can activate the Gzip module so it will sent a compressed file to the browser, and most modern browser support this. More bandwidth to save and make your web application loading faster
  4. Remove Hidden White space image
    Many web designer use image for a white space, use &nbsp which is more small bytes to use.
Even the bandwidth and CPU is more cheaper, there is no excuse to not optimize every bit of the infrastructure. Bigger file in web application means bigger memory to load the application, more CPU cycles in processing, more time in user waiting the application to load, and waste more money.

So try to make improvement in every aspect of the application. It worth a lot even your application only have small user, but will serve better when your site get slashdotted.

Saturday 27 July 2013

Angular JS for Single Page Application

Recently I came up to see a front end framework , which many of them in the net you can find.

The reason for that is i need a framework to build a web application with ajax technology for front end and also backend with ease.

Then i find many of the framework and learn some of them. I found BackboneJS is interesting, but many coding with MVC framework type coding.
Then i also hear AngularJS which developed by google developer there, obviously by many smart people.
AngularJS also provide MVC standart, but they said in their documentation that AngularJS is MV* type of framework.

And after reading many resources in the web and a Book, i prefer the AngularJS to build my next generation Web Application with Ajax Powered feature.

This is the new journey to developing a single page application, after been with php and django framework. But still the Django design patern experience, i love the django way of design thing.

Next will be the learning to build a single web application using AngularJS.

Twitter Delicious Facebook Digg Stumbleupon Favorites More