Mobil Mewah

Salah satu sumber Inspirasi.

Mobil Sport terbaik

Anda pasti bisa memilikinya.

Bermain dengan pesawat

Salah satu ide yang gila, Balapan di udara.

Bermain di angkasa

Apakah ini salah satu Goals dalam hidup anda? anda pasti bisa mencapainya

Sunday, 26 January 2014

Resize LVM partition in Debian Linux

I have my Lenovo T430 laptop with Debian Wheezy installed. My setup was a root partition / with 5Gb size, and 70Gb /home partition.  I use Fluxbox desktop in my laptop and happy with the customization i can do.

The problem now is the root partition is getting full as the application installed under root partition. So i need to extend the size. Lucky i use LVM in linux. so i can just resize it. Always keep your installation CD because it is needed now.

Some step i make i documented here so i can refer back to the procedure. here we go the step i was done :

1. Boot using the install CD.
2. Choose advanced - rescue mode
3. Do not select any mount partition, use installation shell mode.
4. Scan the pv using pvscan , then lvscan until you see your LVM partition on disk.
5. Now we got the lvm partition, in my case /dev/HG/root . Then do vgchange -ay.
6. Before resize, do disk checking by e2fsck -f /dev/HG/root
7. Because i want to extend the lvm size do : lvextend -L +5G /dev/HG/root
8. Then we extend the partition : resize2fs -p /dev/HG/root  

Let say we want to reduce the root partition from 5G to 4G, we do the same step until step 7.
If we want to reduce the step different from step 7 which is :
7. Because want to reduce, we reduce the partition first :
     resize2fs /dev/HG/root 3G
8. Then we reduce the lvm partition :
    lvreduce -L 4G /dev/HG/root
9. Then we make the Fs use all the lvm partition prepared :
    resize2fs /dev/HG/root

Well this was my experience with LVM partition resize and extend.

Thanks for reading and hope its helpful to others.

Tuesday, 21 January 2014

Install Node JS in Debian Squeeze

Using my debian 6.0 squeeze, i need to set node js machine.

Debian Squeeze currently don't have any package for node js. So we need to install it manually using the source code.

The node version are v0.10.24 , you can download from www.nodejs.org the source code.

The to prepare the compilation make sure you have the curl package, openssl and SSL lib.

$ sudo apt-get install curl openssl libssl-dev

Then start install node js :

$ sudo ./configure --openssl-libpath=/usr/lib/ssl
$ sudo make
$ sudo make test
$ sudo make install

$node -v  

You will get the node version. And start install node package using NPM, which is included in the source and installed already.


Tuesday, 17 December 2013

Repair WIndows 7 MBR boot record

I have Windows 7 installation, and try to dual boot with FreeBSD 9. Then problem occurs and fail to create the BSD. and then the Windows 7 cannot boot either. The windows partition is still not touched, but cannot boot to windows.

So the question was how to repair the Windows 7 Master Boot Record (MBR) ?

After search on google, there are solution to repair it using the windows 7 instalation disk.

Here are the step done and documented :

1. Boot to the Windows 7 installation disk


2.  Select the Install Now


3. Select the recovery mode


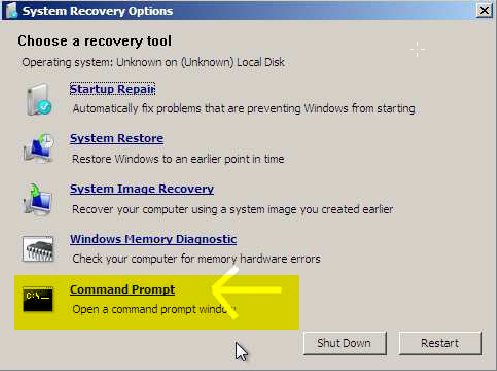
 4. Select the command prompt options.


5. Then you got some msdos prompt like :
    x:\windows\system32>
6. Then type :  dispkart  and press enter
7. Type : select disk 0  and press enter
8. Type : list volume and press enter
9.There will be a list of volume, search for your windows 7 cdrom drive letter.
10. Then type :  exit  and press enter
11. Then go to your windows 7 dvd drive , if it is g then go to g: by type G: and then enter
12. Then type  cd boot
13. Then to restore your MBR do this :
       bootsect /nt60 SYS /mbr  and press enter
14. Then you will be informed about the BOOTMGR volume update.
15. Then exit the msdos, and reboot/ restart.

Don't forget eject your DVD, and your windows7 will be boot and can be use again.

Welcome back to the windows.


Wednesday, 4 December 2013

Linux in usb pen drive

Linux is a very powerfull Operating System, and USB pen drive now days are very cheap and affordable with bigger size every year.

What you can do with the old USB pen drive which you have since the day 1 you use USB pen drive, let say the 1 GB USB pen drive you have. To small for storing your image and music files right ?

But don't keep your USB pen drive in the store room. You can use your old USB to boot a Linux Operating System. Yes you can even with minimal 1 GB size of USB pen drive.

You can install many Linux Distro, like Ubuntu , Damn small Linux (50Mb ISO) and many others Linux distros you can have.

This time, we use Linux Damn Small Linux distros and install it in USB pen Drive. To install to USB, we can use windows as the host. Download the tools here and get your ISO files from Damn Small Linux website.

The DSL linux version used was DSL-4.4.10 , download around 50Mb to your local drive, then install using the tools to install to USB pen drive.

Then change your booting preference in the BIOS to enable boot to USB pen drive. But you also can boot the DSL in windows, just read the readme file provided after the installation finish.

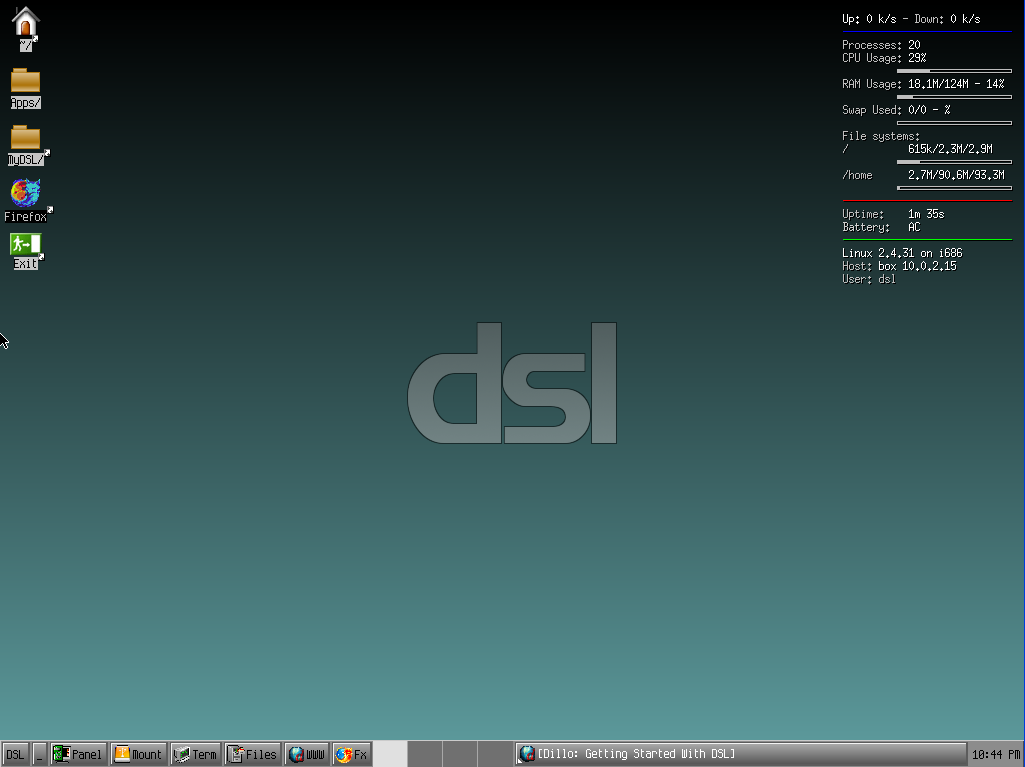
Here are the screen shoot of the DSL linux Desktop.

DSL Linux
DSL Linux Desktop


Django error when doing insert

Django error when doing insert
What is the cause of error like this in django + postgresql application :

DatabaseError: current transaction is aborted, commands ignored until end of transaction block

What happen was I import a production database to my development database. Then there are some south migration that not running locally. I found in forum, the problem maybe with the migration or syncdb.

But all already checked, same error still happen when insert to table.

Then check the sql log, the Aha moment was raised, the problem with the table was no value for ID fields which should be auto increment or serial type in postgresql.

So alter the table field and change it to serial type. Then the error was gone.

So the problem was with the table fields. Check your sql log with this type of error. You will find the problem there.


Tuesday, 3 December 2013

Postgresql backup and restore

When doing some development, we need a fast backup and restore for database data in postgresql server.

The package provide an easy way to do the backup and restore in 1 command.

You only need the username and password + the database name to be working on.

Here are the backup command signature :


Backup : $pg_dump -U {user-name} {source_db} -f {dumpfile.sql}

Restore: $psql -U {user-name} -d {destination_db} -f {dumpfile.sql}

So this command is straighforward. I dump a 1000 records in 5 seconds.

Also note that the privilege and db owner is follow in the dump file. You must prepare the exact username and database, with no table in it.
This is because the generated dump database not include a drop table command.


But how if we want to backup all database ? Of course we can do it to.

Backup all postgres databases :

We can backup all databases in postgres using pg_dumpall command .

To do the backup run this command :

$pg_dumpall > all.sql


We also can verify if all database is backed up using a grep command :


$grep "^[\]connect" all.sql
\connect blog
\connect facebook
\connect mytweet

What if we want to backup a specific postgres table ? hell yeah you can .

Backup a specific postgres table

The command are :


$pg_dump --table production -U acongbebo -f onlyproduction.sql


Postgresql is a powerfull database you can imagine. support for GIS database already included.

Monday, 2 December 2013

Postgresql DB Initialization in FreeBSD

Here are some command that used for administrating postgresql database.

The OS being use was FreeBSD9.1 with postgresql 8.3 


TO enable postgresql service add this in /etc/rc.conf :

postgresql_enable=”Yes”

postgresql_data=”/usr/local/pgsql/data”

postgresql_flags=”-w –s –m fast”

postgresql_initdb_flags=”—encoding=utf-8 –lc-collate=C”

postgresql_class=”default”


To install init db :

#/usr/local/etc/rc.d/postgresql initdb


We don’t have root user and a user in freebsd, so create one.

#su pgsql

#createuser dba    [set as
superuser]

Then change password :

#psql postgres dba

postgres=# ALTER
USER dba WITH PASSWORD ‘newpass’;

To create database :

#createdb mydb –o acong

[o] is owner of db

There we are. The database mydb ready to use and access from local host only.

Later on how to do backup and restore in Postgresql fast.

Twitter Delicious Facebook Digg Stumbleupon Favorites More