Mobil Mewah

Salah satu sumber Inspirasi.

Mobil Sport terbaik

Anda pasti bisa memilikinya.

Bermain dengan pesawat

Salah satu ide yang gila, Balapan di udara.

Bermain di angkasa

Apakah ini salah satu Goals dalam hidup anda? anda pasti bisa mencapainya

Saturday, 12 November 2016

CouchDB test performance using httperf

After test an erlang framework to serve JSON API from a postgreSQL database, i remember that had installed CouchDB in my laptop, and why not use it with same data and try the performance load using the same httperf command.

The result of json from couchdb :

{
  "total_rows": 2,
  "offset": 0,
  "rows": [
    {
      "id": "2f9bc9fb62f3e8fa19ace932b9000d9f",
      "key": "2f9bc9fb62f3e8fa19ace932b9000d9f",
      "value": {
        "_id": "2f9bc9fb62f3e8fa19ace932b9000d9f",
        "_rev": "1-0a77ba71f874dc7ca2b7d22893cf4882",
        "task": "learn",
        "status": "not done"
      }
    },
    {
      "id": "2f9bc9fb62f3e8fa19ace932b90013d9",
      "key": "2f9bc9fb62f3e8fa19ace932b90013d9",
      "value": {
        "_id": "2f9bc9fb62f3e8fa19ace932b90013d9",
        "_rev": "1-6127c1359f9d34d2733943876931e7d4",
        "task": "erlang",
        "status": "not done"
      }
    }
  ]
}

And the design document to retreive the data save with path /todo/_design/todo/_view/list

function(doc) {
  emit(doc._id, doc);
}


so here are the result with same data.


httperf --client=0/1 --server=127.0.0.1 --port=5984 --uri=/todo/_design/todo/_view/list --rate=150 --send-buffer=4096 --recv-buffer=16384 --num-conns=27000 --num-calls=1
httperf: warning: open file limit > FD_SETSIZE; limiting max. # of open files to FD_SETSIZE
Maximum connect burst length: 1

Total: connections 27000 requests 27000 replies 27000 test-duration 179.995 s

Connection rate: 150.0 conn/s (6.7 ms/conn, <=13 concurrent connections)
Connection time [ms]: min 0.6 avg 1.1 max 92.4 median 0.5 stddev 2.5
Connection time [ms]: connect 0.0
Connection length [replies/conn]: 1.000

Request rate: 150.0 req/s (6.7 ms/req)
Request size [B]: 90.0

Reply rate [replies/s]: min 149.8 avg 150.0 max 150.0 stddev 0.0 (36 samples)
Reply time [ms]: response 1.1 transfer 0.1
Reply size [B]: header 231.0 content 470.0 footer 2.0 (total 703.0)
Reply status: 1xx=0 2xx=27000 3xx=0 4xx=0 5xx=0

CPU time [s]: user 62.39 system 117.63 (user 34.7% system 65.4% total 100.0%)
Net I/O: 115.9 KB/s (0.9*10^6 bps)

Errors: total 0 client-timo 0 socket-timo 0 connrefused 0 connreset 0
Errors: fd-unavail 0 addrunavail 0 ftab-full 0 other 0

As we can see the result is almost the same. no error happening, all request processed with 6.7ms / request.
Test done in 179 s or 3 minutes. I don't know if all erlang use same processing to dump json.

Anyhow, great result and positif about this.

Erlang Chicago Boss JSON API test performance

I am documenting my test on erlang web framework, Chicago Boss and use it for backend API.
My setting for the database using Postgresql 9.2 using 1 table with 2 rows and 4 fields only and return the request using JSON.

I test the performance load using httperf on my debian 8 laptop.

# httperf --server 127.0.0.1 --port 8001 --uri /todo/list --rate 150 --num-conn 27000 --num-call 1

In this simple test, the same page is retrieved repeatedly. The rate at which requests are issued is 150 per second. The test involves initiating a total of 27,000 TCP connections and on each connection one HTTP call is performed (a call consists of sending a request and receiving a reply)

 The result should be like this if access from browser :

{
  "todos": [
    {
      "id": "todo-1",
      "task": "learning",
      "status": "not done",
      "owner": "Voldomore"
    },
    {
      "id": "todo-2",
      "task": "erlang",
      "status": "not done",
      "owner": "Potter"
    }
  ]
}

and the result of httperf : 

httperf --client=0/1 --server=127.0.0.1 --port=8001 --uri=/todo/list --rate=150 --send-buffer=4096 --recv-buffer=16384 --num-conns=27000 --num-calls=1
httperf: warning: open file limit > FD_SETSIZE; limiting max. # of open files to FD_SETSIZE
Maximum connect burst length: 1

Total: connections 27000 requests 27000 replies 27000 test-duration 179.999 s

Connection rate: 150.0 conn/s (6.7 ms/conn, <=13 concurrent connections)
Connection time [ms]: min 3.9 avg 6.6 max 85.4 median 5.5 stddev 4.5
Connection time [ms]: connect 0.0
Connection length [replies/conn]: 1.000

Request rate: 150.0 req/s (6.7 ms/req)
Request size [B]: 71.0

Reply rate [replies/s]: min 149.8 avg 150.0 max 150.2 stddev 0.1 (36 samples)
Reply time [ms]: response 6.6 transfer 0.0
Reply size [B]: header 125.0 content 673.0 footer 0.0 (total 798.0)
Reply status: 1xx=0 2xx=27000 3xx=0 4xx=0 5xx=0

CPU time [s]: user 55.66 system 124.11 (user 30.9% system 68.9% total 99.9%)
Net I/O: 127.3 KB/s (1.0*10^6 bps)

Errors: total 0 client-timo 0 socket-timo 0 connrefused 0 connreset 0
Errors: fd-unavail 0 addrunavail 0 ftab-full 0 other 0


What i see are 179 seconds (3 minutes) to complete all the request, and with basic setup. only have a model and controller to list. I want to try it using Django Rest Framework also later on to see how django rest framework performance. But surely Erlang faster. Just want to know how many can be handled by DRF.


Sunday, 21 August 2016

Creating a base view in backbone marianotte js the good way

Marionette JS is based on Backbone JS and a lot of the module extend from basic backbone modules. Here i learn when i extend a module whether it was a view or model or anything you will do like this :

var BaseForm = Marionette.ItemView.extend({


      initialize: function(){

           this.title = "title"

      },


});


and to use it on a custom page view base on the BaseForm you will do this :

var contactForm = BaseForm.extend({


      initialize: function(){

            this.rows = 2;

      },


});


Above problem is the main object title from the BaseForm is gone, except you do this inside contactForm :

       initialize: function(){

             BaseForm.prototype.initialize.call(this);

             this.rows = 2;

      },


With the above method, anything initialized on the BaseForm will still be available.

But this create problem that everytime you override the initialize, you need call the prototype. How if we not touch the initialize in the BaseForm, and just create a new method, that will be checked by the initialize method on the BaseForm.
So here are the new way on doing this :

//BaseForm default initialize

var BaseForm = Marionette.ItemView.extend({


      initialize: function(){

           this.title = "title",


          if (this.additionalInit){

              this.additionalInit();

          },


      },


});

//we extend from BaseForm without touch initialization code
var contactForm = BaseForm.extend({
   
      additionalInit: function(){
            this.rows = 2;
      },
});

The benefit of this, any developer want to use the module, no need break the module by override the initialization, or if do want additional custom function running after the initialization base modul load, provide the function that the initialization checks, in this case additionalInit function.


Saturday, 20 August 2016

GlusterFS for scalable storage

When look for a storage, a simple thing for system admin was a NAS. With a NAS appliance, your life is easier. Plug and forget, if ever happend to the harddisk, just replace it as already have RAID system. But still, the storage size is limited to the disk bay provided and a disk size available, also with RAID, disk size is limited to the smallest disk available.

So when we need a future expanding of the storage size, NAS is not an easy way to do the storage expansion. Come the GlusterFS for storage cluster. With GlusterFS you can easily expand / scale out your storage size. just add a server and a disk storage, put it on the glusterFS cluster, your storage size is bigger.

Some of notes when using GlusterFS :
1. Run on Linux server
2. Use XFS file system (recommended by Redhat)
3. Use LVM system
4. Use Hardware RAID for disk level redundancy
5. Use native glusterFS client

The important thing to highlight is use the native glusterFS client as it will provide redundancy, because all the data stored on the storage nodes, the client will fetch it automaticly by connecting to all the nodes inside the storage cluster. The initial connection only to the mount point node of the storage cluster. This will provide load balance of load inside the storage.

Also the RAID on hardware level. If Disk problem, just swap it as provided by the RAID hardware. Easier to do than setup RAID on the OS level.

For the default configuration, GlusterFS distributed your file to each storage nodes. You can have other options in GlusterFS base on your needs as :

1. Distributed Volumes
2. Replicated Volumes
3. Striped Volumes
4. Distributed Striped Volumes
5. Distributed Replicated Volumes
6. Distributed Striped Replicated Volumes
7. Striped Replicated Volumes
8. Dispersed Volumes

To provide redundancy and availablility, i am using Distributed Replicated setup, where i set 2 replica and distributed the store to every nodes.
The minimum brick required are 4 (assumes each server have 1 brick only).
So we distribute the data to 4 storage node, with 2 replica on each data.

GlusterFS Distributed Replicated Volume. Source: GlusterFS Documentation

This storage setup i used for Owncloud storage backend.
With this, we able to expand the storage size anytime with adding more VM or server node to the cluster.

Wednesday, 17 August 2016

Marionette JS the basic of javascript Front End

When talk about Front End development, developers will look how to build fast and update fast. With basic javascript, you can build a frond end app, but will have a boiler plate code. So people look for frameworks and library. As my journey on developing Front End web apps, first look to using plain HTML + CSS + Javascript , which will use Jquery of course.

Move on to the next level, developer tends will use a framework. There are plenty of frameworks, like AngularJS, EmberJS, BackboneJS. Each have their own benefits. I have try angularJS, and with current angularJS status, i don't fell like it. It breaks everything, and you will have to follow if you still want to use AngularJS. Do they even think about their users? How about my apps ?

I try to use the basic with javascript + Jquery, and see on backboneJS is trying help on dealing with javascript better, and also support Jquery. Even better with the available Marionette JS. I like the concept of region and layout, which every application will have that thing and you have full control over it as developer.

So now my journey on Backbone JS + Marionette JS will evolve, and with the backend will use Django as the horse power.

Like many framework, you need to see not only how to create apps faster, but manageable and reusable code. After using Django for web development, you will want the reusable and manageable code in your repository.

Front End web App is the way to a distribute work load, processing on client side.

My way is Backbone JS with Marionette JS.


Sunday, 26 June 2016

Restrict user command using SUDO in Linux

Restrict user to run a specific command as root
Linux Security Police : Sudo
In Linux world we can restrict a user to run a specific command that need to be root privileges. Just use sudo and give sudo permission to user. But wait, that will give a super user privileges to the given user. They can do any Root user do, reboot, shutdown, rm -Rf /*  . Oh my, so what can we do.

In sudo still we can permit a user to run a specific command as a root level user, without giving all the root access privileges. In the Sudo documentation, it stated there but need more understanding as i do when go to the documentation.

So here my aim to just target the specific need to restrict a user run a specific command that need root privileges without giving all the root level privileges. So lets start with the use case.

I need a user  account that can execute a program that can start a service. User cannot restart other services than we specified. Let say the service is vpnconnect.sh , located in /usr/sbin . user just run sudo vpnconnect.sh restart to restart the service.

So we use visudo to edit the sudo files for safety and auto checking for errors when saving the file. Here are the step :


  1. Add a command alias in the sudo file using visudo.

    Cmnd_Alias VPNC = /usr/sbin/vpnconnect.sh
  2. Add the usergroup to allow run the command

    %support   ALL = (ALL)  VPNC
  3. Create a group called support

    #groupadd support
  4. Create a username and add it to the group.

    #useradd superman -g support
    #passwd superman
  5. Thats it!
So now you have create a user with username superman. try login using SSH and then execute the command.

#sudo /usr/sbin/vpnconnect.sh restart

It will prompt for password to able to run it. If you try it with other user which not yet registered on the support group, it will fail.

So thats all. Normal user will not able to run command that need superuser account level like reboot, restart , restart and stop a service. 

Hope this helps.


Thursday, 9 June 2016

Rest API with Django REST framework

Rest API with Django REST framework
When working with REST Api in your own application, you want to create a REST api which is follow the web standard of REST. In python , especially Django Worl, you can use Django REST framework. It support the REST Method , GET, POST, PUT, DELETE and handle it for you in the back ground.

So with this blog post, i want to have a post about my experience on working with Django REST framework. I never use it until my requirement for application goes to Mobile app, which surely the front end can be build using any hybrid method using javascript library/frameworks available, and in the back end, Python + Django still my super hero.

OK lets start, the Views in Django will be the same with Views in Django REST framework. And also the model will still be the same. We will reuse the model we already have. So the flow of creating a REST api in Django REST framework are :

1. Create Model
2. Create Serializer for the model
3. Create view for the model
4. Assign to the url.py of django

With this you will get the API browseable UI with only the above effort for you to test the API.

Step1. The models.py

from django.db import models

class Sms(models.Model):
    created = models.DateTimeField(auto_now_add=True)
    message = models.CharField(max_length=100, blank=True, default='')
    phone = models.TextField()
   
    class Meta:
        ordering = ('created',)


Step 2. the serializers.py

from rest_framework import serializers
from sms.models import Sms


class SmsSerializer(serializers.Serializer):

      model = Sms
        fields = ('id','created','message','phone')


Step 3. The view.py

from rest_framework import status
from rest_framework.decorators import api_view
from rest_framework.response import Response
from sms.models import Sms
from sms.serializers import SmsSerializer


@api_view(['GET', 'POST'])
def sms_list(request):
    """
    List all sms, or create a new sms
    """
    if request.method == 'GET':
        sms = Sms.objects.all()
        serializer = SmsSerializer(sms, many=True)
        return Response(serializer.data)

    elif request.method == 'POST':
        serializer = SmsSerializer(data=request.data)
        if serializer.is_valid():
            serializer.save()
            return Response(serializer.data, status=status.HTTP_201_CREATED)
        return Response(serializer.errors, status=status.HTTP_400_BAD_REQUEST)


@api_view(['GET', 'PUT', 'DELETE'])
def sms_detail(request, pk):
    """
    Retrieve, update or delete a sms instance.
    """
    try:
        sms = Sms.objects.get(pk=pk)
    except Sms.DoesNotExist:
        return Response(status=status.HTTP_404_NOT_FOUND)

    if request.method == 'GET':
        serializer = SmsSerializer(sms)
        return Response(serializer.data)

    elif request.method == 'PUT':
        serializer = SmsSerializer(sms, data=request.data)
        if serializer.is_valid():
            serializer.save()
            return Response(serializer.data)
        return Response(serializer.errors, status=status.HTTP_400_BAD_REQUEST)

    elif request.method == 'DELETE':
        sms.delete()
        return Response(status=status.HTTP_204_NO_CONTENT)


step 4. The url.py :

from django.conf.urls import url
from rest_framework.urlpatterns import format_suffix_patterns
from sms import views

urlpatterns = [
    url(r'^sms/$', views.sms_list),
    url(r'^sms/(?P[0-9]+)$', views.sms_detail),
]

urlpatterns = format_suffix_patterns(urlpatterns)

So the above step is how to create an api with your way, and full control on the views method you do before return the data to the rest api users.

There are another way to reduce your typing with Django REST framework, and i will post in on another blogpost.

So here it is, Django REST frameork.

Tuesday, 7 June 2016

updgrade Django-1.7.11 to 1.8.13

After upgrade my django to 1.7.11 , now the next version is 1.8.13.

So as usual i create a new virtualenv, with django-1.8.13 as the requirement, install the env with pip install.

The application affected which i use some are documented here.


  1. Error on django-compressor-1.6 library.
    I try upgrade to django-compressor-2.0 and it fixed.
  2. Django complain about south database module 'south.db.postgresql_psycopg2'. The warning tell to just remove south or using other supported database in south on SOUTH_DATABASE_ADAPTER settings.
    As Django have the build in migration, i will remove south package from my installation settings, and also remove the package in my virtualenv, so the warning message go away.
  3. Warning on appconf modules. we use django-appconf-0.6 which required by django-compressor.
    The latest version is 1.0.1 , and after upgrade the warning is gone.
  4. Django nose errors when running test. Need upgrade from django-nose-1.2 to django-nose-1.4.3
  5. Test using py.test got error because django test need using database access.
    Upgrade the pytest-django-2.7.0 to pytest-django-2.9.0 will make test work again.


Thats all what i found when upgrading my django-1.7.11 to django-1.8.13 latest version.

Next will try to django-1.9.7 the latest version as now.

Hope this post help you Djangoers.


Sunday, 29 May 2016

Django Test Improvement Speed

Testing do not distrub
Testing in software development is a tedious task, and some programmers skip it. But many start to do the right thing from the beginning, Test Driven Development (TDD) movement make software developer more aware on delivering properly tested battle proven software. I also using TDD with my Django development.

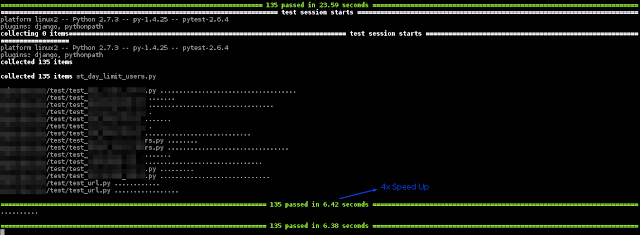
One of factor when your test getting more and more in quantity, the test running slow as the test increased as your software getting more complex. I notice that my test is 135 cases, and need to wait 25 seconds to finish all the test. The test way run using py.test and using Django test also. Of course the test using SQLite on memory database to speed up the test. Also Pytest give the test speed an increase.

Then i read on documentation that for testing, Django still using default setup on other thing in the framework which can be removed in testing environment, like no middleware, no add on or things that slowing down. 1 i try are change the password hashed in django. The password hasher used by Django authentication was PBKDF2 algorith with a SHA256 hash, a password strecthing mechanism recomended by NISTThis should be sufficient for most users. It's quite secure, requiring massive amounts of computing time to break. This was from Django documentationSure it is save, and sure need more time and processing power to encrypt it. So can we change it in testing environment, to a faster password hasher. Especially when in testing, we have a lot of login and logout session, and it will make the testing longer.

You see in the documentation also state that django have other hasher, one is md5 which is common used for hasing a file and fast enough. Try to use that in the test environment and change the password hasher settings and see the improvement gains. Of course you need to have a test.py settings file used for your testing environment database and other config. Add this entries for hashing using md5.

#Use faster password hasher for testing
PASSWORD_HASHERS = (
    'django.contrib.auth.hashers.MD5PasswordHasher',
)

I try run my test, the improvement was really fast. Here are the screenshoot of my test without the md5 password hasher which using default hasher.

Raw Django Test
Raw Django Test
Then below the result when using md5 password hasher.

Optimized Django Test

So the improvement was 4 times the speed on testing. Total of 135 test case. I am happy to write my test again as much as possible to increase the quality of my code. Make testing a habit. No more worries when change something on the code will break other part of the code. Test suite will come to the rescue.

Happy Testing and Happy Coding. Testing and Coding should be fun with python.

Saturday, 28 May 2016

Upgrading Django-1-6 to 1-7 part 2

This is part 2 of upgrading Django-1.6 to Django-1.7 journey. For part 1 you can go Here.

First error was my application using a module that was deprecated since Django-1.6 which already give me warning to fix it, but i ignore it. And i remember that, so i remove it and update with other lib.
The lib i use was django.utils.simplejson.

from django.utils import simplejson 

I change it to using json lib.

import json

Next is the testing give a warning that i am using settings  from django-1.5 which should be updated. I found out it was the test runner should be stated in the settings.py. So addition of the settings was added :

TEST_RUNNER = 'django.test.runner.DiscoverRunner'

Then test suite not give any warning message again, and the test all success.

Next is the django-debug-toolbar, i was using old version which are 1.0.1, and need to upgrade to django-debug-toolbar-1.4 because the import is giving error when using old version of django-debug-toolbar.

Next is the Django-compressor , i was using django-compressor-1.4 , and need to upgrade todjango-compressor-1.6.

And also change in HttpResponse , if you use mimetype , you should change it to content_type.

    return HttpResponse(json.dumps(dataxx), mimetype='application/json')

Update to this :

    return HttpResponse(json.dumps(dataxx), content_type='application/json')

And last one is the migration which already using south. If the app is newly developed and no db migration, no migration at all will give no problem. What if you have already migration in south running and deployed on the production, now you start develop using new django version, the migration will be need to use django build in migration. Well as in Django-1.7 migration already build in and use south,as the author said it will support on django-1.7.
Below is from south documentation.
This is the last major release of South, as migrations have been rolled into Django itself as part of the 1.7 release, and my efforts are now concentrated there. South will continue to receive security updates but no feature updates will be provided.
So for existing migration files, move the migrations folder to south_migrations, as django will use migrations folder for it migration. Then you need upgrade to south-1.0.2 which will first look in south_migrations directory, and fallback to migrations directory if not found.

And of course, south will not run on django-1.7.11. How we going to do with previous south migration created? we can still use django-1.6 with virtualenv, and run the south migration from there. But it is not recommended as in production will be to hard to maintain 2 virtualenv and also 2 migration in the long run. So when upgrade finish, better make django migration hold all the migration.

Next is in django model forms. You must specify the field you will include in the form creation. Django-1.7 give warning that it will removed in Django-1.8. So better clean up before next update will give you complete errors.

So hope my journey here will give other Djangonouts a heads up on the update bump you might encountered.


Upgrading Django-1-6 to 1-7 part 1

Django Upgrade
Currently Django already in version 1.9 the latest. And my Django app developed on Django version 1.6 since my last update. As the support and update will not delivered to version 1.6, better to upgrade it to the next version, which is 1.7 .

In upgrading a Python web framework like Django, the path not easy especially if you already build and using many library. Some will support the new version, some just not available for the new version of Django. As 1.7 is long enough, i will try my upgrade with virtualenv just like my previous upgrade from 1.5 to 1.6 in here.

So why need to upgrade. Actually, the why is have different answers on each case. For me, i want to have the update and feature Django new version offers, but provide stable framework for my development and app. Because so many component already in use and to make sure the app not break is the first priority. Some library i use were django-compressor, django-debug-toolbar, pytest for testing, south for database migration.

Some of the library like south migration, in django-1.7 already have the migration in core, so will need to remove south and use default migration shipped with django.

I will make this blog as an upgrade process log which i run step by step. Some notes are currently i am upgrading from Django-1.6.5 . If you still running Django-1.5.x you need upgrade it to django-1.6.x first.
As what best practice to do on every upgrade, one should read about the change logs in the new version. The new change in django-1.7 was :

1. Migration in core , which can replace south-migration lib if you use it.
2. Some deprecated lib like django.utils.simplejson. You can use json in new django-1.7
3. Test runner setup that changes
4. Support Python > 1.7

For details release notes can go to Django-1.7 Release notes

Let's start the migration path on new Django-1.7.11 from Django-1.6. First of all, we will using virtualenv in python for the upgrade. First we have the running old django in virtualenv, we need create new virtualenv and install the new Django-1.7.11

# cd /home/masterman/
# makevirtualenv dj-1.7.11
# workon dj-1.7.11

Then we can now install all the package we need for the webapp. I assume you will have requirements files to be feed to pip for installation. If you have the django requirement, change the version of django to Django==1.7.11

Then run the installation using pip :
# pip install -r requirements.txt

It will install all the requirement lib of the project you have, including django-1.7.11

I assume you project still intact, and in my case is /home/masterman/super-ecommerce/
Because i have test build in my app, and no changes, i can test it using django-1.7.11.

#py.test

This will test all my test file and give error if encountered. Thats why we need a test in every application we build so this things help us in migration or updates. Test is worth the effort.

And then voila, if there is errors you will spot where the errors are. And for me, i found some errors regarding the application library i use.

Continue on next part >>>

Wednesday, 18 May 2016

Postgresql Database basic Tune up

Postgresql is a robust database. it can server thousand of request per minute, if tune properly.

SQL Tune Up
Some basic config you can do for tune the database are documented below.

Memory use :

shared_buffers = 2GB
# RAM/4 up to 8 GB

work_mem = 32MB
#Non shared memory use for sort , etc
# 8 MB to 32 Mb: web
# 128MB to 1 GB: reporting
# limit : Ram/(max_connection/2)

effetive_cache_sie = 6GB
# 3/4 of RAM

wal_buffers = 64Mb
# just set it

maintenance_work_mem = 512MB
# RAM/32
# more for reporting , use by analyze and autovacuum

checkpoint_segments = 64
# make WAL bigger
# space / 32 MB

checkpoint_completion_target = 0.9

stats_temp_directory = '/mnt/ramdisk'
#help with latency

random_page_cost = 1.5
# for AWS, SSD , decision for using index / io

effective_io_concurrency = 4
#for AWS, SSD, RAID

Logging Part , can use with pgBadger to read all the logs and view statistics :

log_connections = on
log_disconnections = on
log_temp_files = 1kB
log_lock_waits = on
log_checkpoints = on
log_min_duration_statement = 0

What we can do for optimize postgresql :

- Do less querying
- fix resoiurce-hungry requests
- get adequate hardware
- scale your infrastructure
- tune the config
- do caching on your application

source :
https://www.youtube.com/watch?v=dBeXS5aFLNc&list=PLE7tQUdRKcyaRCK5zIQFW-5XcPZOE-y9t

Monday, 22 February 2016

Microsoft Exchange 2007 Logging

With Microsoft Exchange 2007 everything should be running smooth after first install and for new administrator with Exchange this is great. But when you need to get the logs of the server transaction, the default settings was not enough.


Let say the log retention, size of the logs, and other things will be need to adjusted according your organization requirements. This will also affect the server sizing and performance. Thats why sometimes click and pray doesn't works well.

Here my journey on Exchange 2007 email tracking.

I want to know if message tracking enabled, using exchange management shell :

Get-TransportServer | fl *messagetracking*

you can see is it enabled, max age, max directory size, max file size, and the file path.

how to enable / disable it ? here the command :

Set-TransportServer SERVERNAME –MessageTrackingLogEnabled $false or $true

How if we want to log using different path/disk ? note that path should local to exchange server

Set-TransportServer SERVERNAME –MessageTrackingLogPath "D:\TrackingLogs"

and make sure the security as administrator have Full control, Systems need full control, Network services needs Read, Write, and Delete Subfolders and Files.

How about the max directory size ?

Set-TransportServer Servername –MessageTrackingLogMaxDirectorySize 500MB

and for max log files :

Set-TransportServer CorpExch –MessageTrackingLogMaxFileSize 5MB

And the maximum Log file Age by default are 30 days in exchange 2007. To modify :

Set-TransportServer SERVERNAME –MessageTrackingLogMaxAge DD.HH:MM:SS

So let say your organization needs 3 month logs to be retreived, set :

Set-TransportServer CorpExch –MessageTrackingLogMaxAge 90.00:00:00

And for subject logging, it is by default enabled in exchange 2007, you can disable it by :

Set-TransportServer CorpExchangeServre –MessageTrackingLogSubjectLoggingEnabled $false

And how if want to see detail transaction log for send and receive of smtp log? you need to enable it manually as it not enabled by default.

To enable outbound SMTP logging use Set-SendConnector "Connector Name" -ProtocolLoggingLevel verbose. By default it is set to none.

To enable inbound SMTP logging use Set-RecieveConnector "Connector Name" -ProtcolLoggingLevel verbose.


So there was my journey. If need logs more than default 30 days, you better enable it.


Saturday, 20 February 2016

Running CGI script on Nginx Web Server on FreeBSD

Yes CGI is an old technology. I encounter to be able run an old CGI script for testing on my development project. And i am using Nginx stack rather than install apache. So we can run CGI script with Nginx web server. Here how i do it and documenting it here.

on FreeBSD 9.0 server, we using fcgiwrap application.

#cd /usr/ports/www/fcgiwrap/
#make install clean

Then enable it to run in /etc/rc.conf  :

#echo "fcgiwrap_enable='YES'" >> /etc/rc.conf

Then start the fcgiwrap. it will be available in /var/run/fcgiwrap/fcgiwrap.sock

To use it, just redirect the script to be run with fcgiwrap.sock.

Here the nginx setup.

server {

      listen  80;
      server_name    login.freehostspotsystem.com;

      location / {
         root /usr/local/www/super/system/free;
         index index.html index.html;
      }
       
     location /cgi-bin/ 
     {
         gzip off;
         root /usr/local/www/super/system/free;
         fastcgi_pass unix:/var/run/fcgiwrap/fcgiwrap.sock;
         
         include /usr/local/etc/nginx/fastcgi_params;
         fastcgi_param  SCRIPT_FILENAME $document_root$fastcgi_script_name;

     }

And put your cgi file in /usr/local/www/super/system/free/cgi-bin/login.cgi

so when user go to http://login.freehotspotsystem.com/cgi-bin/login.cgi  , user will got the page.


Twitter Delicious Facebook Digg Stumbleupon Favorites More